How to Use the Instruments 27
curve, scale, circles, pen, fig, drawing, drawn, inch and size
33. The Architect's Scale. Often, in actual practice, it becomes necessary to make a draw ing either larger or smaller than the actual object. This is called drawing to scale. If, for example, the drawing is to be made one twenty fourth actual size, then each dimension will be one twenty-fourth of the real size. To avoid the necessity of dividing each dimension by 24 when making the drawing, the one twenty fourth size scale is used. For one twenty-fourth size, one foot would be drawn as one-half inch; and one inch as one-twelfth of one-half inch, or one twenty-fourth inch. A scale of one twenty fourth size is therefore spoken of as a scale of one-half inch to the foot, or, using the signs, In Fig. 23 is shown one end of an Architect's triangular scale, in which the upper edge is divided to the scale of = 1'. This would be used in making a drawing on the scale of = 1'. The smallest spaces represent inches, and the longer undivided space between 0 and 1 represents one foot. No mental calculation, then, is necessary with this scale, as the required dimensions are laid off directly. For example, a length of 1 foot 7 inches would be laid off as shown in the figure.

The beginner should become familiar with the use of the scale, by actually laying off vari ous dimensions in feet and inches, using the different scales in turn.
34. The Compass. Before using the coin pass (Fig. 3), see that the lead and the needle point project the same distance. In drawing circles, the compass should be held with the thumb and first two fingers at the extreme top, with the needle-point pressed on the paper only enough to hold it in place. When drawing large circles, the legs should be bent at the joints so that the lower part of each leg is vertical or nearly so.
35. The Lengthening Bar. The compass just described may be used for circles up to 6 or 7 inches radius; but above this distance, the lengthening bar (Fig. 4) should be used, which will enable one readily to draw circles up to 9 inches radius.
For larger circles, the beam compass (Fig. 11) should be used.
To attach the lengthening bar, loosen the screw which fastens the pencil leg, remove the leg, insert the lengthener, put the pencil leg in the other end of the lengthening bar, and tighten up both screws.
36. The Dividers. The hair spring dividers (Fig. 6) are used for laying off or transferring exact distances. This some times takes the form of dividing a given line, straight or curved, into a certain number of equal spaces, and it is in this kind of work that the hair-spring in the leg is especially useful. The screw in the leg is for fine adjustment, for, with any setting of the dividers, a slight turn of the screw changes the distance between the needle-points by a very small amount. Setting up the screw increases the space, while turning the screw out lessens the distance between the points.
37. The small dividers or bow spacers (Fig. 7), are very useful for short distances where the large dividers would be awkward to handle.
38. The bow pencil or small compass (Fig. 8) is very convenient for circles or arcs of 1 inch or less in radius. If a number of small circles of the same size are to be drawn, the setting is much less likely to be accidentally changed than with the large compass.
39. The bow pen (Fig. 9) is indispensable where very small circles are to be inked, and is preferable for circles up to 1 inch or inches radius.
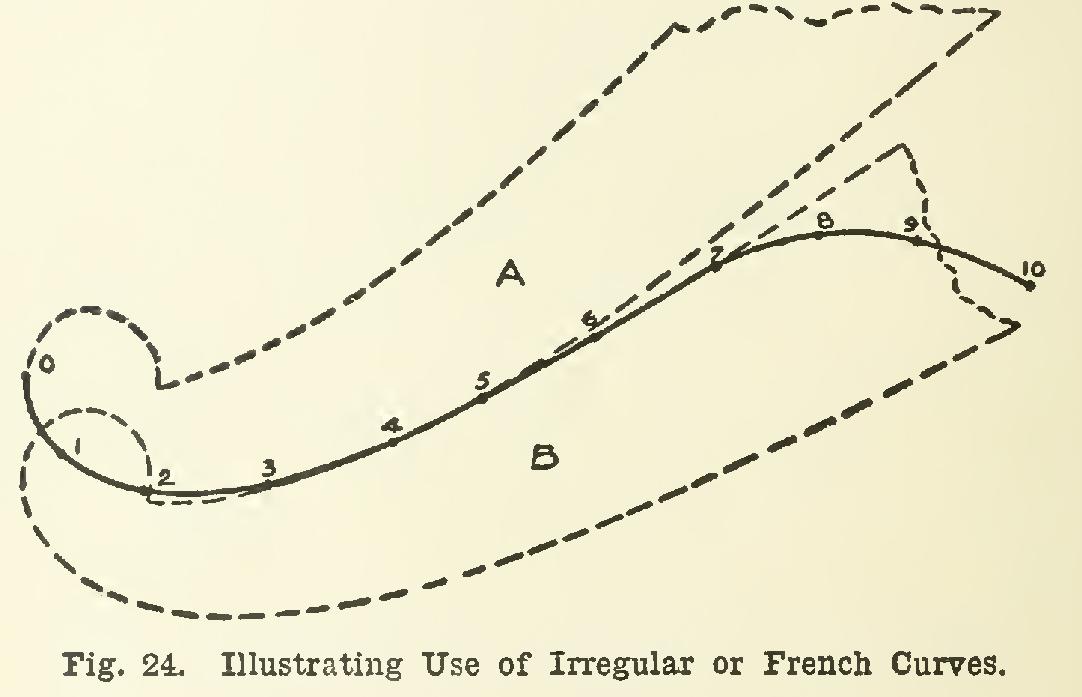
40. The Irregular or French Curves. Sup pose that the points 0, 1, 2, etc., to 10, Fig. 24, are to be connected with a smooth curve. First sketch a freehand curve through the points. Next take one of the irregular curves, and find a part of the edge which will coincide with the sketched curve for as long a distance as possible. Beginning at point 0, suppose that the edge can be fitted nearly to the point 5, as shown in the dotted position A. The curve may then be drawn against the edge in this position as far as the lengths are exactly coincident. The curve is then shifted to another position, as B, so that a further portion 5, 6, 7, of the sketched curve coincides with a part of the irregular curve, and also so that the curve in position B runs back and coincides with a part of what is already lined in.
Special attention should be paid to this latter statement, for, to insure a smooth, continuous curve, it is essential that when each new portion of the curve is drawn, the curved edge must also coincide with a part of what is already drawn. The remainder of the curve through points 7, 8, 9, and 10, may be drawn in a similar manner, either by the further use of the same irregular curve or by the aid of a different one.
41. Inking. In practical work, drawings very often have to be made in ink. This may be done in two ways. The pencil drawing may be lined in with ink, as in drawings for the Patent Office or for book work; or an ink draw ing may be made on tracing cloth tacked on the board over the pencil drawing. In either case, certain general rules apply.
42. To ink with the ruling pen, places small quantity of ink between the points or nibs of the pen, using either a quill or a common writing pen. Care should be taken that no ink remains on the outside of the ruling pen, otherwise a blot is likely to result. In inking straight lines, the thumb-screw for regulating the width of line is always held away from the straight edge which guides the pen. Both nibs should rest equally on the paper, and the pen should be inclined slightly in the direction of its motion. The pen should always be drawn along, never pushed. In other words, the pen should always follow the hand.