The Adjustable Fence
square, inches, run, brace, gauge, pattern, line and tongue
THE ADJUSTABLE FENCE Notwithstanding the marvelous capabilities of the steel square in itself, the functions of this versatile tool can be greatly extended by the aid of auxiliary devices and appendages.
A necessary appendange to the steel square in solving mechanical problems, is what we call, for want of a better name, an adjustable fence. This is made out of a piece of hardwood 2 inches wide, and 2 feet 10 inches long (being cut so that it will pack in a tool chest), and inches thick; run a gauge line down the center of both edges; this done, run a saw kerf cutting down these gauge lines at least one foot from each end, leaving about ten inches of solid wood in the center of fence. We now take our square and insert the blade in the saw kerf at one end of the fence, and the tongue in the kerf, at the other, the fence forming the third side of a right angled triangle, the blade and the tongue of the square forming the other two sides. A fence may be made to do pretty fair service, if the saw kerf is all cut from one end as shown in Fig. 5. The next step will be to make provision for hold ing the fence tight on the square; this is best done by putting a No. 10, 1k-inch screw in each end of the fence, close up to the blade and tongue; having done this, we are ready to proceed to business.

Application of the Fence.—The fence being made as desired, in either of the methods men tioned, and adjusted to the square, work can be commenced forthwith.
The first attempt will be to make a pattern for a brace, for a four-foot "run." Take a piece of stuff already prepared, six feet long, four inches wide and a half-inch thick.
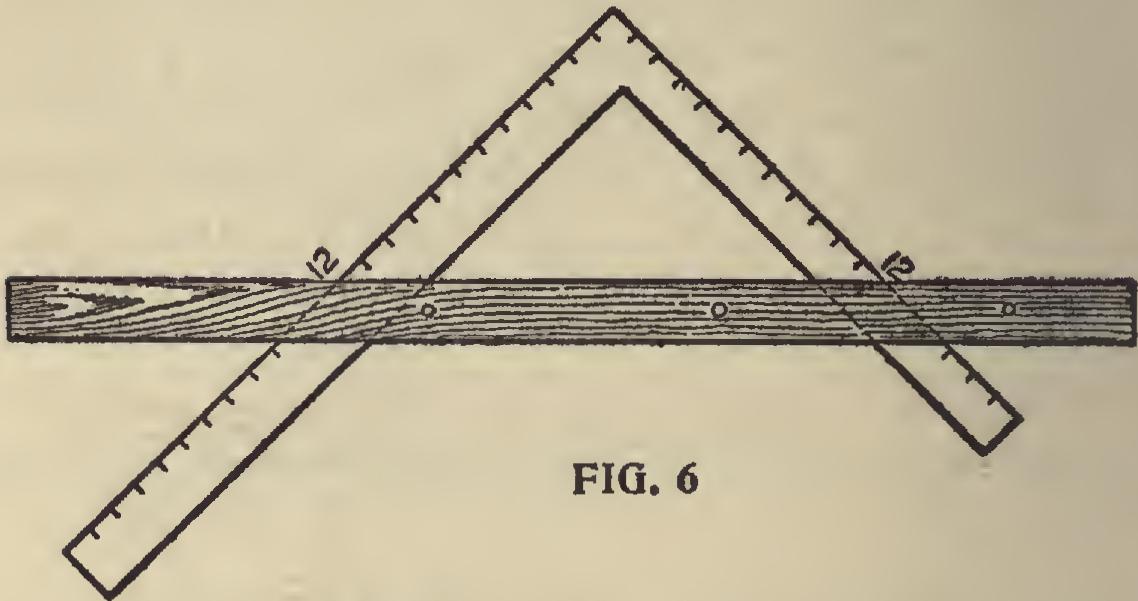
Take the square as arranged at Fig. 6, and place it on the prepared stuff as shown in Fig. 7. Adjust the square so that the twelve-inch lines coincide exactly with the gauge line 0, 0, 0, 0. Hold the square firmly in the position now ob tained, and slide the fence up the tongue and blade until it fits snugly against the jointed edge of the prepared stuff, screw the fence tight on the square, and be sure that the 12-inch marks on both the blade and the tongue are in exact position over the gauge-line.
We are now ready to lay out the pattern. Slide the square to the extreme left, as shown on the dotted lines at X, mark with a knife on the outside edges of the square, cutting the gauge line. Slide the square to the right until the 12 inch mark on the tongue stands over the knife mark on the gauge line; mark the right hand side of the square, cutting the gauge line as before, repeat the process four times, marking the ex treme ends to cut off, and we have the length of the brace and the bevels.
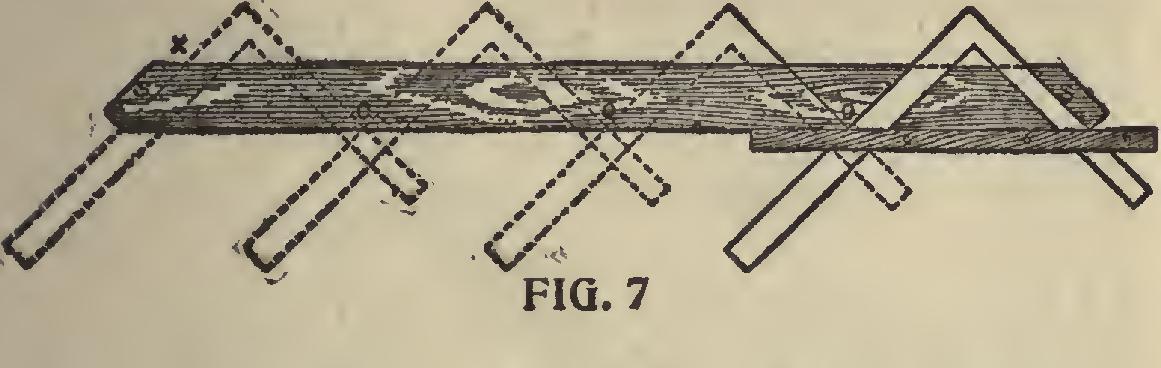
Square over, at each end from the gauge line, and we have the toe of the brace. The lines, S, S, shown at the ends of the pattern, represent the tenons that are to be left on the braces. This pattern is now complete; to make it handy for use, however, nail a strip 2 inches wide on its edge, to answer for a fence and the pattern can then be used either side up.
Formation of a Brace.
The cut in Fig. 8, shows the brace in position, on a reduced scale.
The principle on which the square works in the formation of a brace can easily be understood from this cut, as the dotted lines show the posi tion the square was in when the pattern was laid out.
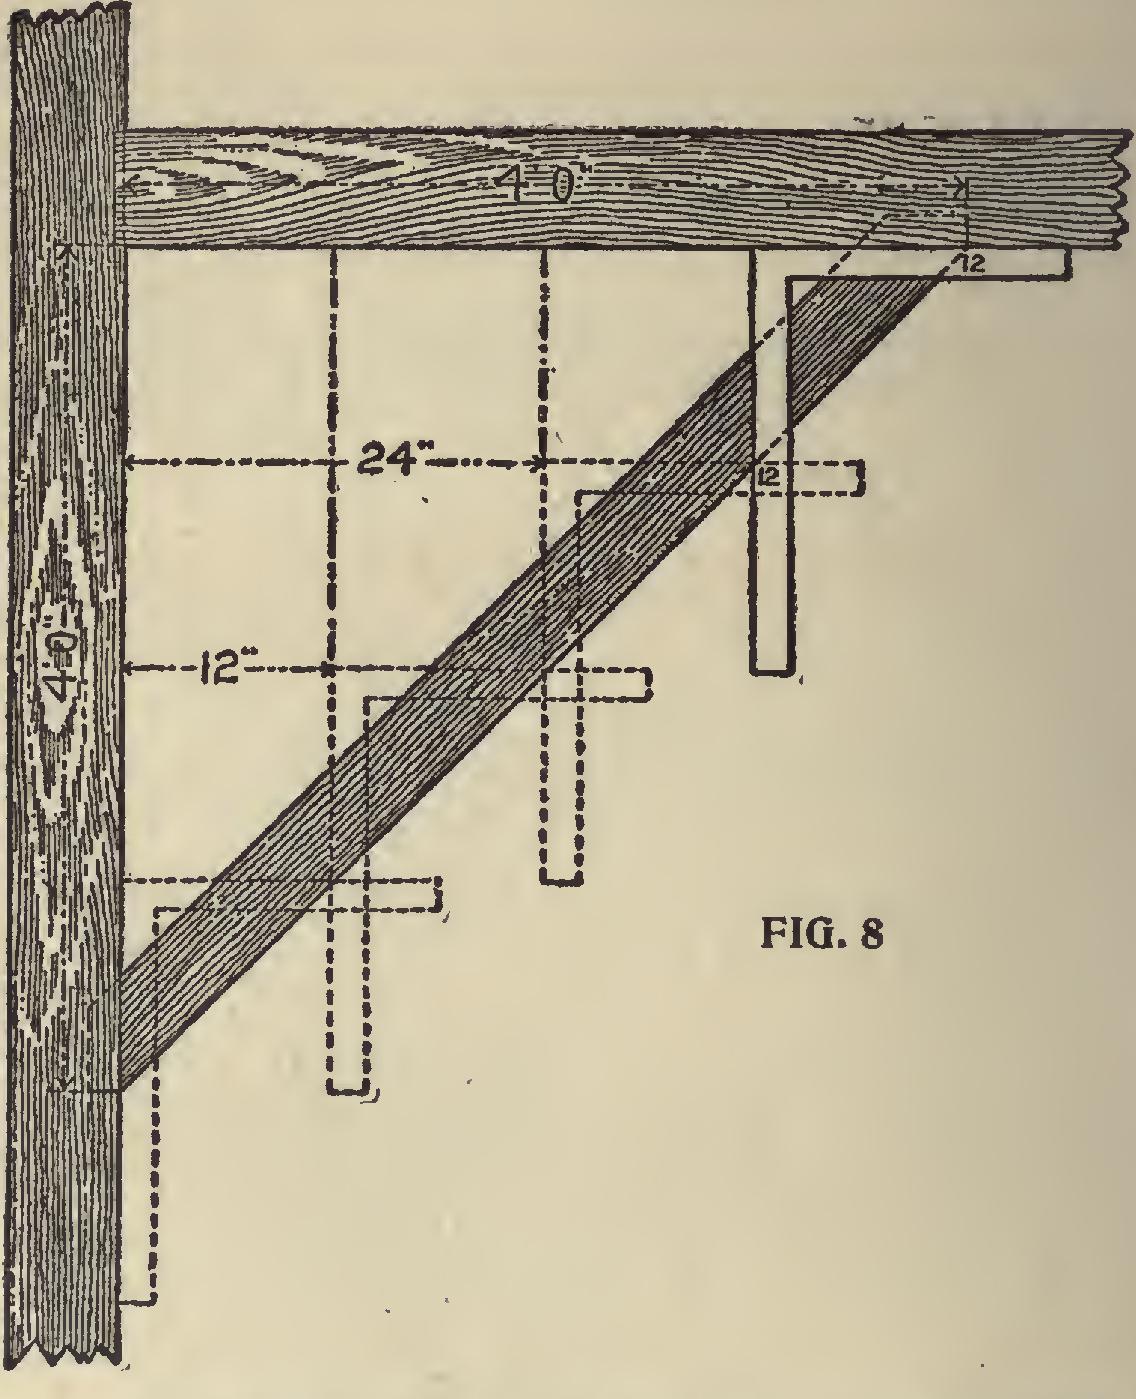
It may be necessary to state that the "square," as now will lay out a brace pattern for any length, if the angle is right and the runs equal. Should the brace be of great length, however, additional care must be taken in the adjustment of the square, for should there be any departure from truth, that departure will be repeated every time the square is moved, and where it would not affect a short run, it might seriously affect a long one.
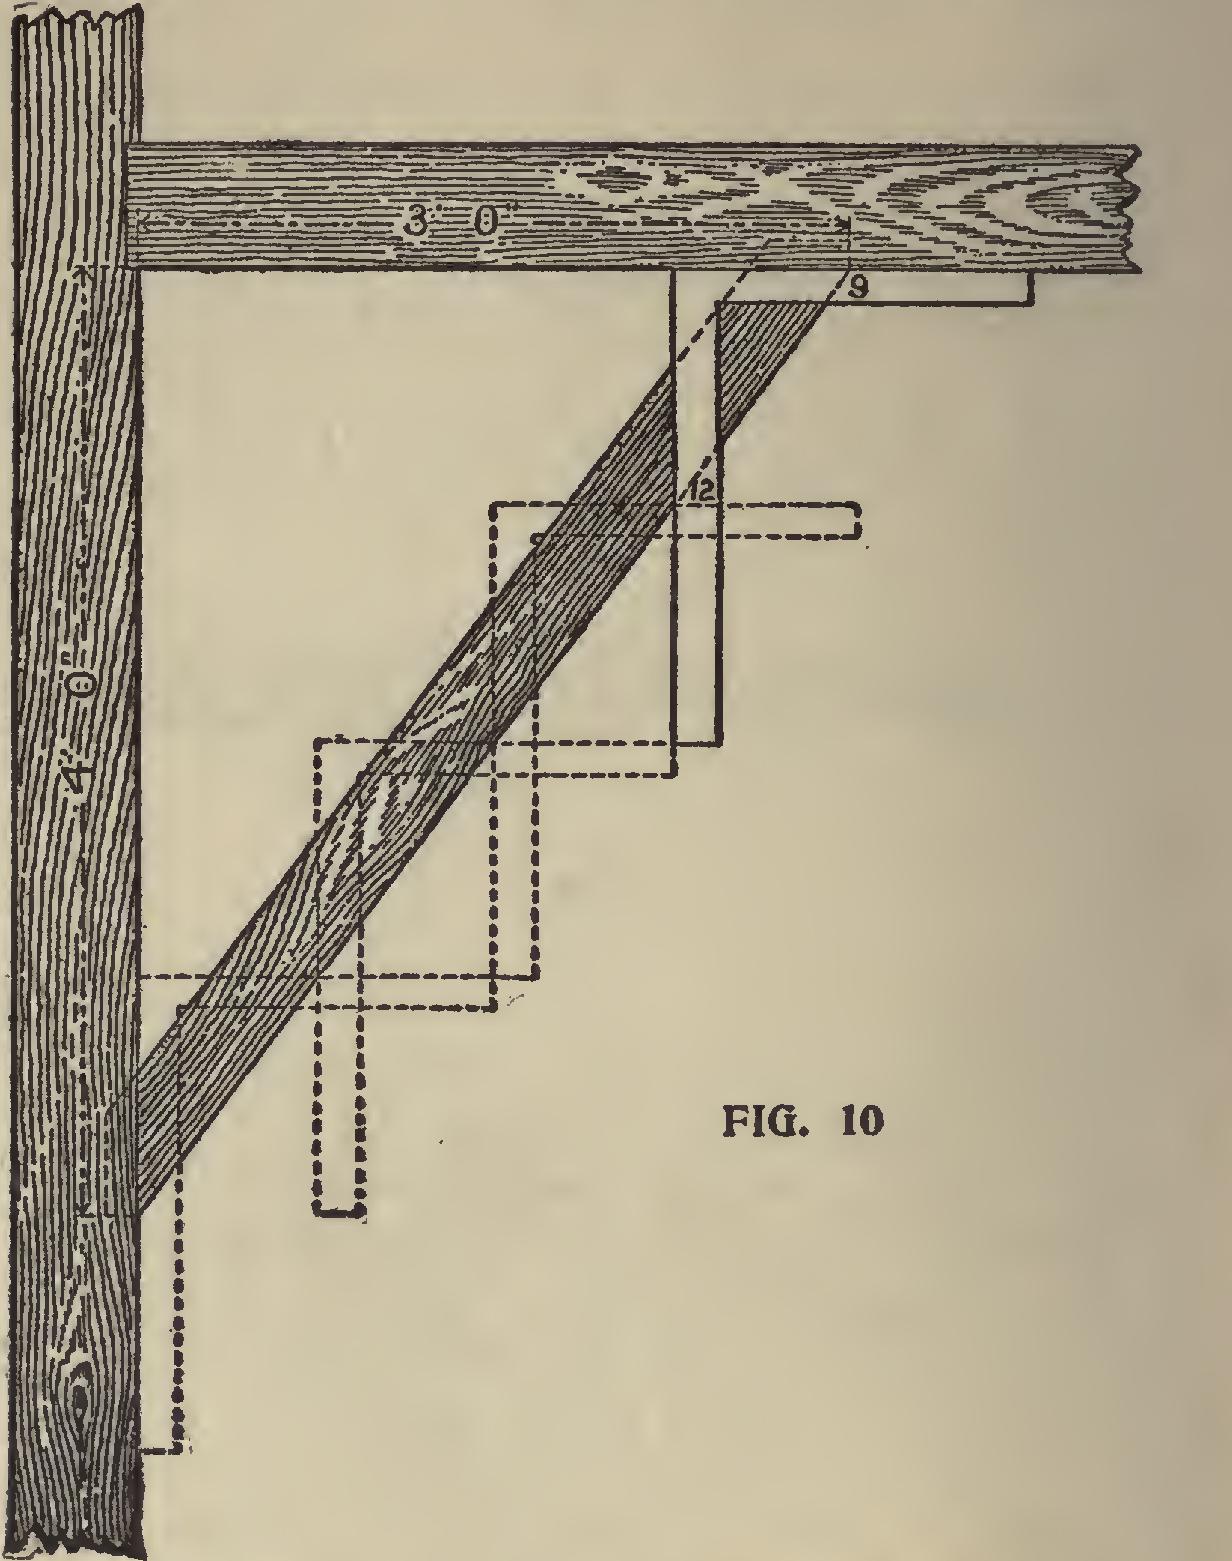
To lay out a pattern for a brace where the run on the beam is three feet, and the run down the post four, proceed as follows: Prepare a piece of stuff, same as the one operated on for a four-foot run; joint and gauge it. Lay the square on the left-hand side, keep the 12-inch mark on the tongue, over the gauge line, place the nine inch mark on the blade, on the gauge line, so that the gauge line forms the third side of the right-angled triangle, the other sides of which are nine and twelve inches respectively.
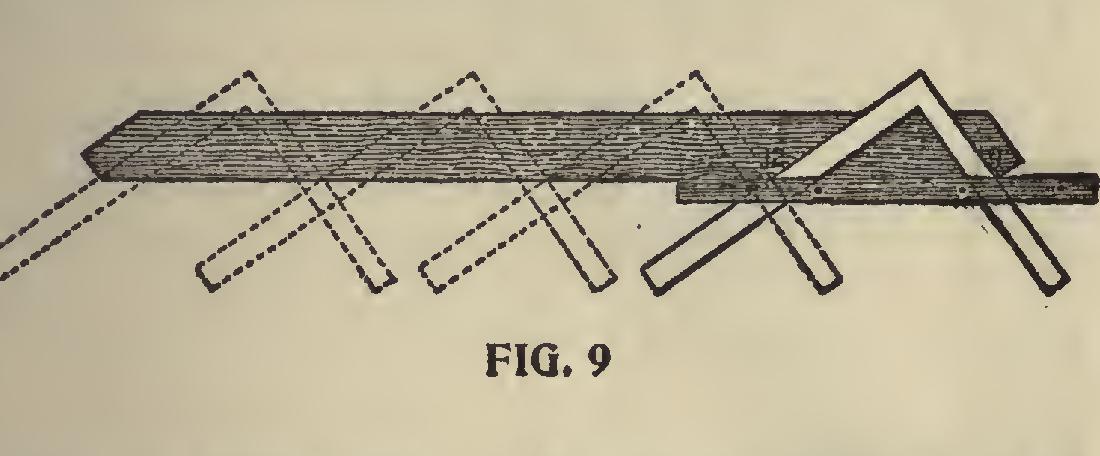
Now proceed as on the former occasion, and as shown in Fig. 9, taking care to mark the bevels at the extreme ends. The dotted lines show the positions of the square, as the pattern is being laid out.
Fig. 10 shows the brace in position, the dotted lines show where the square was placed on the pattern. It is well to thoroughly understand the method of obtaining the lengths and bevels of irregular braces. A little study will soon enable any person to make all kinds of braces.
If we want a brace with a two-foot run, and a four-foot run, it must be evident that, as two is the half of four, so on the square take 12 inches on the tongue, and six inches on the blade, apply four times, and we have the length, and the bevels of a brace for this run.
For a three by four-foot run, take 12 inches on the tongue, and 9 inches on the blade, and apply four times, because, as 3 feet is of four feet, so 9 inches is of 12 inches.