Hanging Wallpaper
paper, length, board, paste, cut, worker, pattern and top
Now unroll a piece of paper on the board; suppose that it is a set pattern—that is, the match is immediately opposite on the paper (in a drop pattern, supposing the pattern to be 12 in. long, the match would occur 6 in. below, instead of directly opposite). The worker must get some detail of the pattern fixed in his memory, say, a leaf, stalk, or other design, near the end. Place the straight-edge across from one part of the pattern to the corresponding part on the other side (see Fig. 71). Press the straight edge firmly with the left hand, take the roll of paper in the right, and, with a sharp movement upward and towards the worker, rip the paper across. This will require some little practice to do cleanly. From the end just cut measure the length required. Perhaps it will come just over the pattern selected to be cut through; in that case, do not cut off, but take in the next pattern, so as to have the same top and bottom; then cut all the lengths. Measure from the ceil ing to the mantelpiece, and cut in the same way. If it is made a rule always to cut through a certain pattern, whichever piece is taken up, there is always the same top, and the worker need not trouble to look for the match every time a short piece is wanted for over the doors or other places.

Turn the lengths over and allow 2 in. at the top and the same at the bottom for cutting into ceiling and skirting (if the ceiling and skirtings are not level, more than 2 in. will have to be al lowed). Cut off the remainder; this can be done half a dozen at a time with the help of the straight-edge.
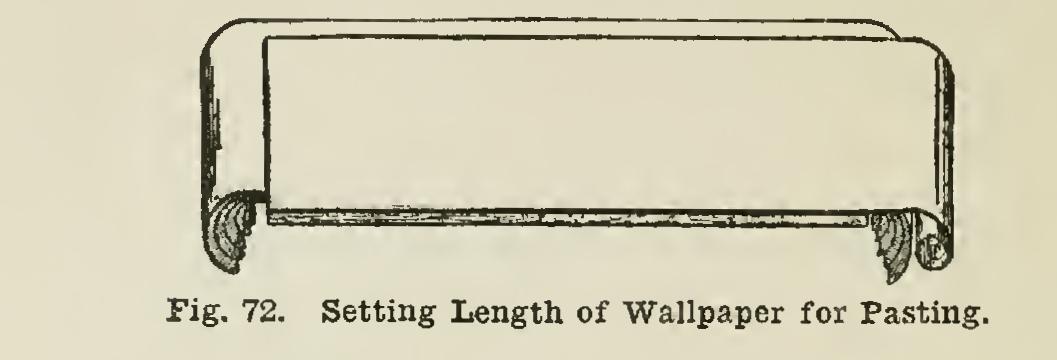
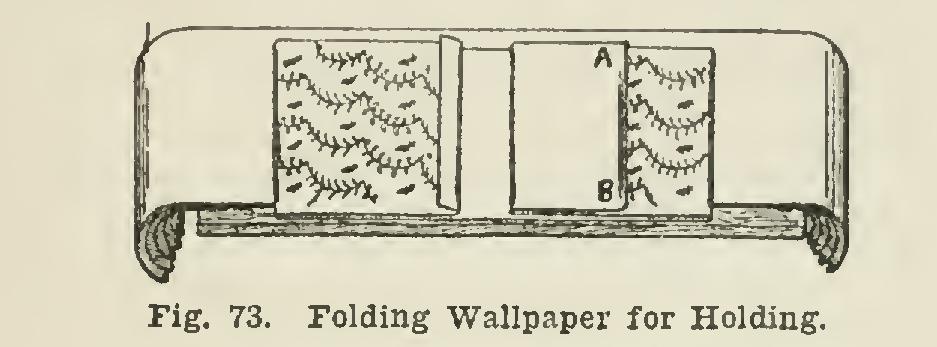
Begin from the right of the window, so that the top of the papers will be on the right-hand end of the board, when the left side of the paper will be next to the worker, and handy for meas uring and marking for the angles. Push the lengths a few inches over the board, and draw the top one towards the worker to within 1 in. of the edge of the board, and the bottom onto the board (see Fig. 72). Paste as much as pos sible on the board, beginning on the farther side acid brushing away from the worker; then draw the paper over towards the worker level with the edge, and finish pasting. Fold the bottom over, not too far, say to a little less than half the length; and turn the inch or so on the end that has not been pasted outward again, pull along, paste the top the same way, and fold as shown in Fig. 73. Take hold at A and B, ascend the steps, and let go the bottom; do not hold the paper stiff so that it drops with a jerk, but let the hands go down with it so as to ease it; place the paper on the wall, and brush carefully, but do not brush it sufficiently to smudge the colors; try with the plumb-bob, and make sure the paper is perfectly upright. Run the joint-roller over
the joints; this need not be done every length— wait till three or four lengths are on, and roll them together. Never roll on the paper itself; place a clean piece over the joint, and roll on that. The paste for this paper should be thin enough to allow it to be spread quickly on the paper.
When an angle or corner is reached, fold the length perfectly square, measure the distance from the last length to the angle (the widest part), and allow in. more. Place the length true with the edge of the board and run a mark down the paper. This can be done with the closed scissors by placing them against the end of the straight-edge, and running the finger along the edge of the board, holding the straight edge at the required width. Papers of this class can be ripped with the straight-edge with a little practice. Hang the length, and run the scissors down the angle so as to press the paper well in. Plumb the next length or part of a length; always plumb the length after working from an angle or corner. Work on round to the door, then begin on the left side of the window. See how many short lengths are required over the window. Cut, paste, and hang them, taking care to carry them across level. Use the spirit-level to ensure correctness. Plumb the next long length from this, and proceed as before till the door is reached.
If the door is in the corner of the room, make the break in the angle. If the door is in the middle of a wall, it will be necessary to finish up in the corner of the mantel-breast, or other place where the join will not show.
Now put up short lengths under the window, and down the sides of door or mantelpiece if any are required, and the room is finished. Be care ful not to get any paste on the ceiling; turn down a few inches of the top, and run the finger across it while fixing the length. If any paste gets on the woodwork, sponge it off, because, as ahead? remarked, paste acts like soda on new paint, and will leave ugly marks if allowed to dry on.
Papering a Bedroom.
In a bedroom it will be assumed that the ceiling has to be papered, and the papers for both ceiling and walls are a luster with an 11-in. frieze. These will require careful handling and treatment, as a spot of paste or a finger-mark will show permanently.
Make a start with the ceiling. Trim the paper on the board, and be careful to trim both edges true. Keep a box of plaster of Paris handy; and if the hands are inclined to perspire, rub them in the plaster now and then.