Tools Used by Painters
fig, paint, brush, brushes, water, knife, bristles, strainer, handle and string
Fig. 33 represents a useful brush, made of black hair and fiber, for washing off old distem per from ceilings and walls. Fig. 34 shows a distemper-brush known as a paddle brush. Nothing but a wash can be spread with it. Fig. 35 is a good shape, but rather too heavy and clumsy for best work.

The five kinds just described are always made with handles as shown. Fig. 37 is made for use with a long handle; otherwise it corre sponds closely with Fig. 33. In some parts of the country this limey is the principal ceiling brush used. A practiced hand can get over a great quantity of sizing and distemper washing with one, and save erecting the scaffold also. Limers of the best kind are as expensive as dis temper brushes. Fig. 36 represents a good pasting-brush, and useful for distemper work also.
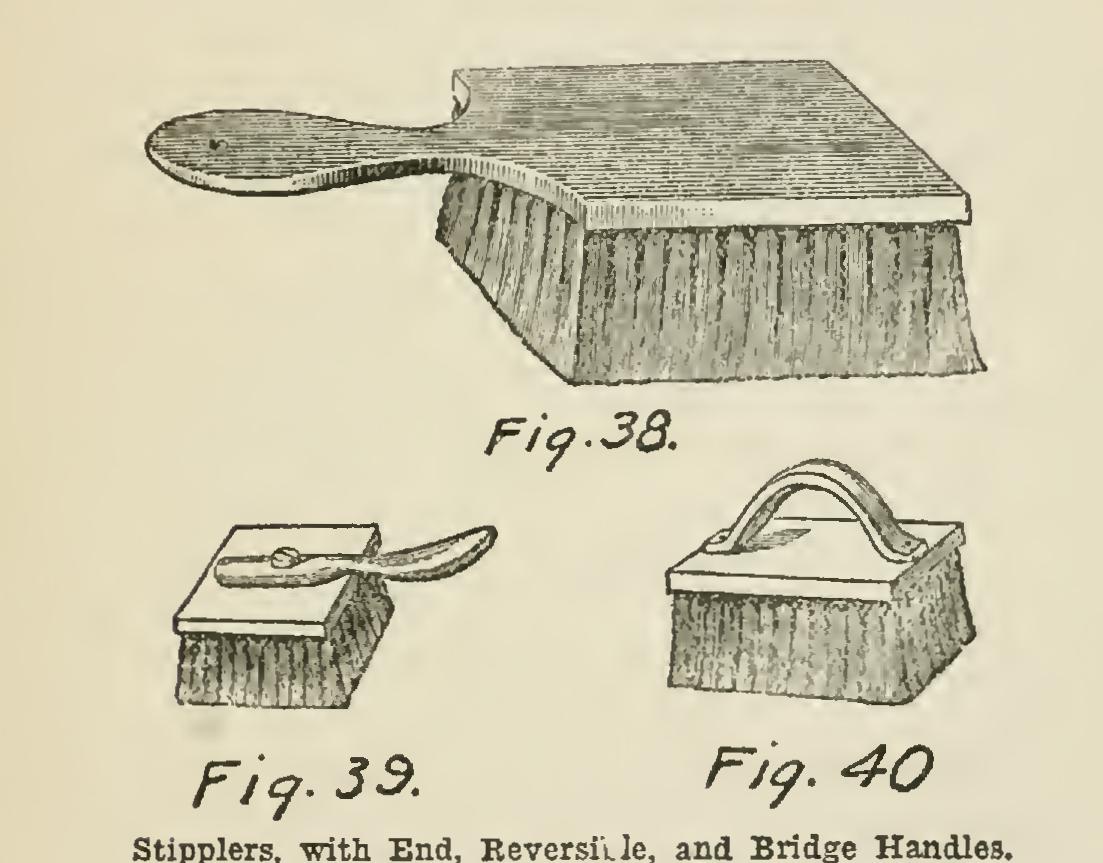
Stipplers are the most costly of painters' brushes. They are used for obliterating the brush markings, in "flatting" and other processes, by a beating action, executed evenly and carefully after the paint is applied and roughly distrib uted. They require careful attention to keep in order, and, directly after use, should be washed with plenty of soap and warm water, without wetting the "stock" or wood. When all the paint is removed, rinse in cold water, and ac celerate the drying by beating on a dry cloth or wash-leather. Fig. 38 shows a stipples with handle at end. Stipplers are also made with handles on the back and reversible handles. Fig. 39 has a reversible handle; Fig. 40 has a bridge handle. They are used for distributing paint or vehicles iu a perfectly regular manner, and for taking out paint-brush streaks. In use, the paint is first spread—a good coat—and then the work is at once stippled with the ends of bristles until a regular surface of a granular nature is obtained.
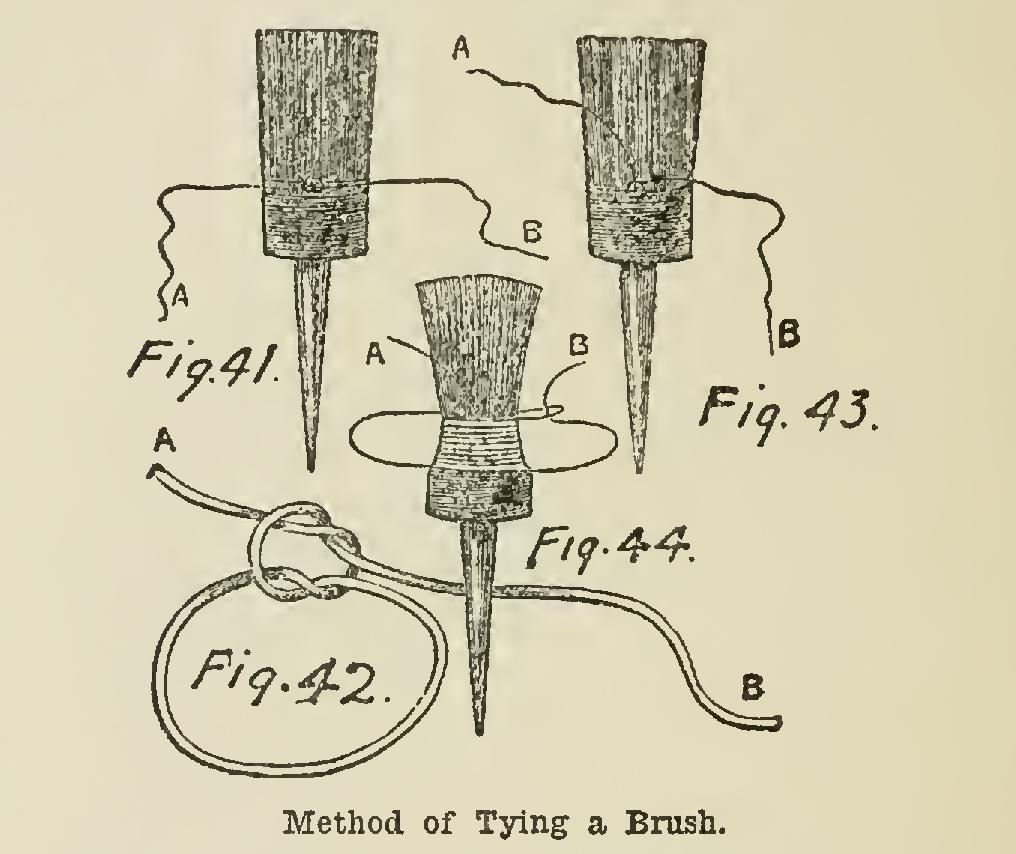
Care of Brushes. Many people who need a paint-brush find that it is too long and limp to work well. It needs tying. This is a difficulty to the inexperienced; and here is a method of tying a brush.
First tie a piece of stout twine around the brush, leaving 6 or 7 inches at one end (marked A in the sketch). Fig. 41 shows the first tie. Fig. 42 shows the form of knot used. The end A should be made to lie along the hair of the brush, Fig. 43, and the string should be coiled around it and the hair of the brush as many times as necessary. When enough has been wound around (Fig. 44), the cord marked B may be bent back, drawn close, and a half-knot made opposite the first knot. Both cords may now be fixed with small tacks to the stock or the handle of the brush, and the superfluous string cut off. The string need not be bound very tightly, for either paint or water will make it sufficiently tight for the purpose for which it is intended. From time to time, part of the string can be removed as the bristles wear away.
Paint-brushes naturally get hard and use less if left exposed to the air with paint in the bristles, since the very property that causes the paint to dry causes this hardening. If the brushes are small and used very seldom, they should have the paint rinsed out with a little turpentine or petroleum; then they should be carefully washed clean with soap in warm water, well rinsed in cold water, and then set aside to dry gradually. Soda ruins the bristles, and hot
water dissolves the cement that holds the bristles to the handles; so do not use either. Brushes used so often that they cannot he washed between times, should have the paint well scraped out, and the brush then stood in a vessel with sufficient water to cover the bristles; but not more than that, since the string binding the brush will rot. Varnish brushes must be served exactly as those used for paint, so far as washing goes; but if they are large brushes, and often required, they must be care fully stood in a vessel containing raw linseed oil instead of water, as with paint-brushes. Each time the brush is required and done with, scrape water, paint. and oil out of it.
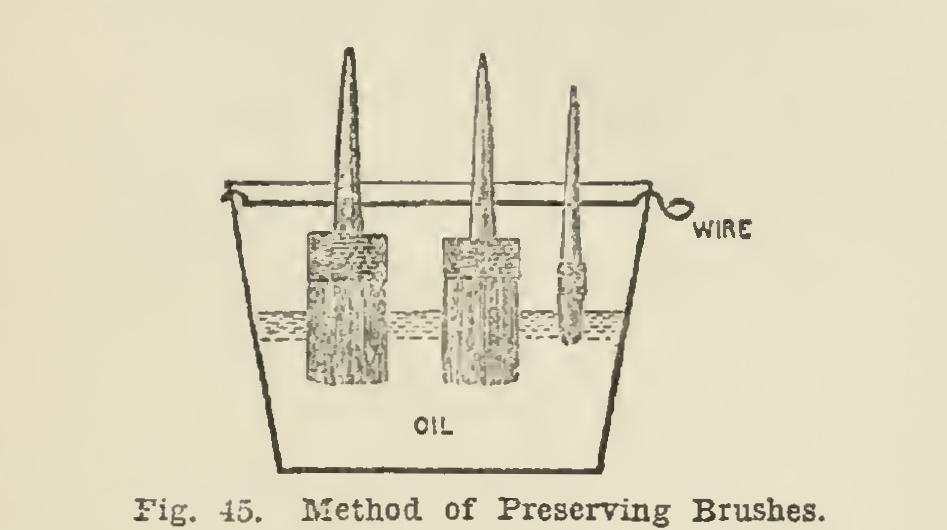
Pig. 45 shows a good method of preserving brushes. Clean out the brushes well, and make a hole in the handles to let the wire pass through, and then let them hang from the wire without touching the bottom; let them dip in linseed oil.
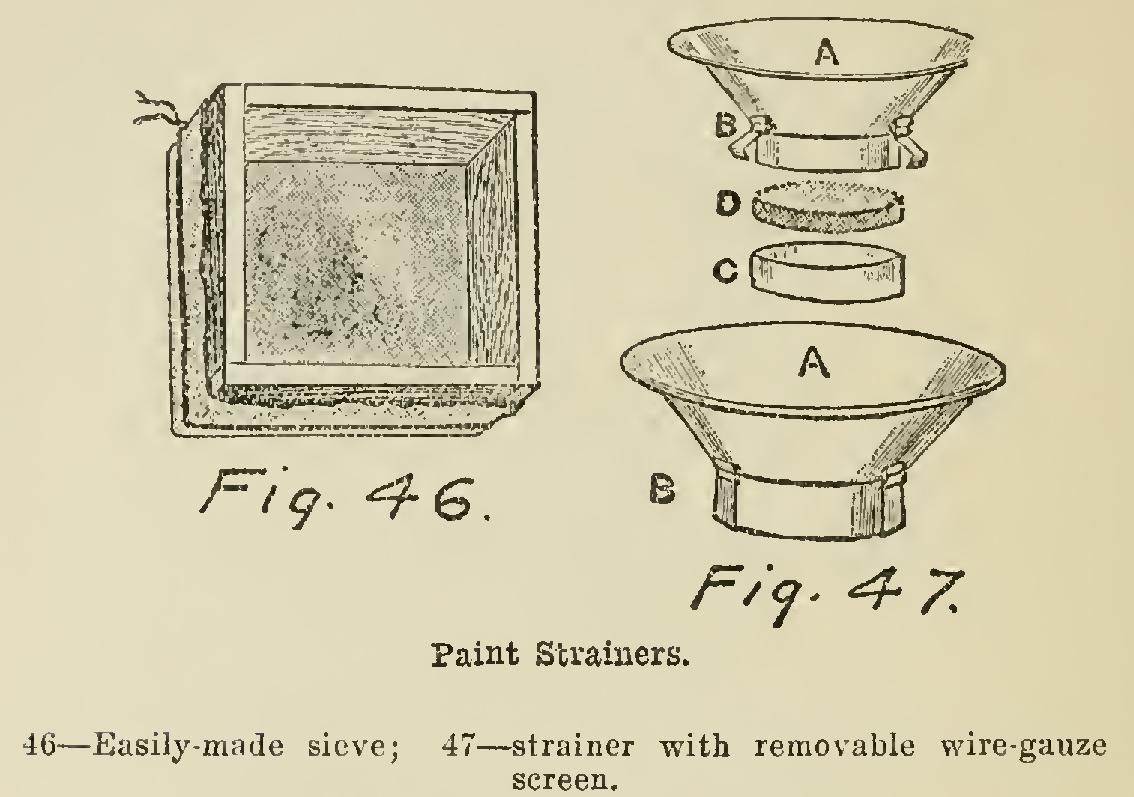
Fig. 46 shows an easily-made sieve for strain ing paints. It is made of four strips of wood about twelve inches long, four inches wide, and one-half inch thick, nailed together to form a frame. A piece of coarse canvas tacked or tied to the frame forms the strainer.
Fig. 47 illustrates a recently-introduced im provement in paint strainers. It is made in such a form that the copper wire gauze which is used as a strainer may be removed, and a fresh piece put on in a very short space of time, thus sav ing the body of the strainer, and rendering it still useful when the wire gauze has been worn out. The body of the strainer, A, at top, is fitted with clips B. The wire gauze 1) fits over the lower part of the strainer, and is held in place by what is called the compression band, C, over which the clips B fit down, holding the different parts tightly together. In the lower part of the illustration the strainer is shown with the gauze and band on, and the clips closed down.
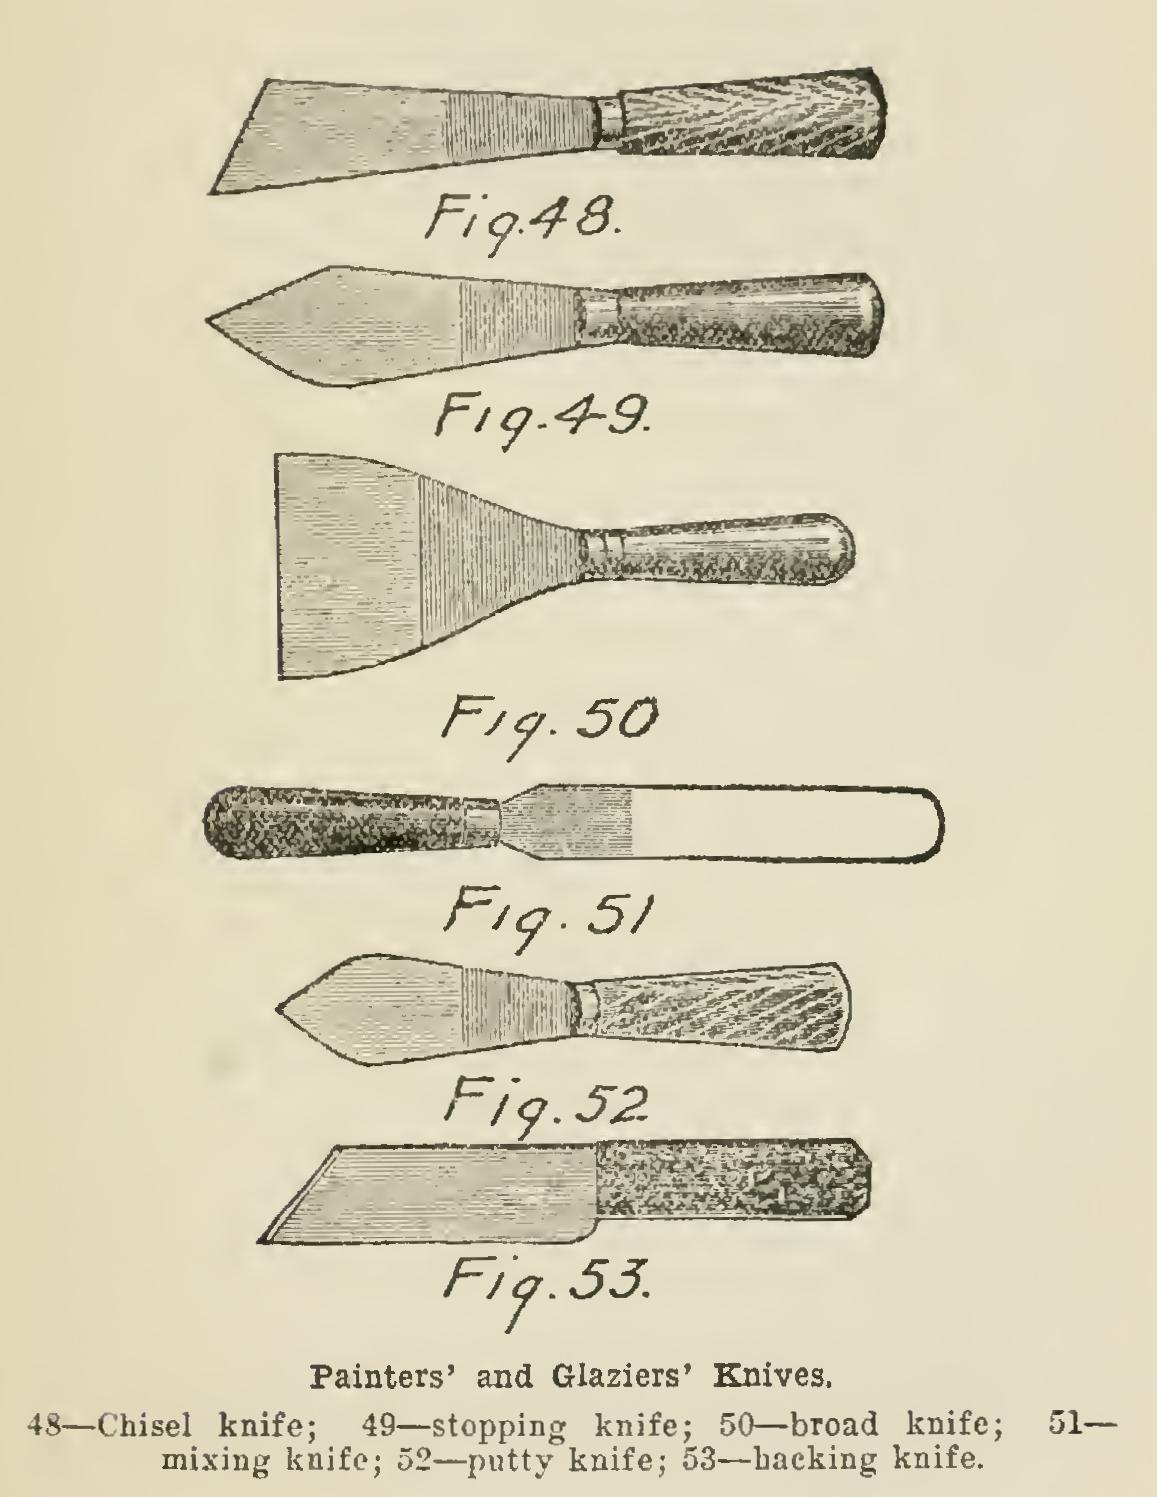
Five of the knives most used by the house painter are shown. Fig. 48 represents a chisel knife; or it may be termed a stopping knife with chisel point. Fig. 49 shows the most useful shape of stopping knife, with which holes and indentations in woodwork, etc., are filled with putty. Fig. 50 is the chisel knife proper, but as often termed the broad knife; this is used for stripping and scraping old walls, filling up wood work, stopping plaster walls, etc., and is a very useful tool. Fig. 51 is a knife having a thin steel blade; it is used for mixing paints on a slab. Fig. 52 and Fig. 53 are more properly glaziers' knives than house painters'; the first is the putty knife, indispensable for glazing sashes; and the latter the hacking knife, for use with a hammer for chipping out the old, hard putty previous to re-glazing.