A Book Rack
pieces, lines, inches, knife, square, mark and piece
A BOOK RACK There are always a few books which one wishes to have near at hand. The book rack of fers an excellent place in which to keep them.
There are many ways in which to make a book rack. Some are made with hinged ends, some with keyed tenons, some are dovetailed, some are grooved, etc.
The book rack shown in Plate 3 (B) is made with the cross-lap joint. Its advantage over others is in its lightness and cheapness, as well as its compactness when folded. Fig. 11 shows top, side, and end views of the rack, with dimen sions.
For the rough stock, cut out two pieces one inch by one inch by sixteen inches; two pieces of the same width and thickness with a length of six and one-half inches. These pieces are for the framework of the base. For the ends, cut two pieces of three-quarter-inch stock to a width of four and one-quarter inches, and a length of five and one-half inches. It will be found con venient to plane the two end pieces to width and thickness before cutting, providing the stock will cut to advantage in so doing. About six inches of one-quarter-inch dowel will be needed.

Where there are several pieces of the same width and thickness, time is saved by planing a working face and joint-edge on each piece before any gauging is done. All the pieces may then be gauged at the same time.
It will be necessary to use the winding sticks on the working faces, as well as the straight edge, unless the eye is so practiced that it can detect inaccuracies by sighting. On such a nar row surface, a keen eye will be required.
Having gauged, plane to the gauge lines care fully.
Do not square the ends, for pointing them makes this operation unnecessary.
Place the two long pieces side by side, and square light pencil lines across at points fifteen and one-quarter inches apart. Carry these lines entirely around the pieces, making sure to keep the beam of the try-square against the working face or joint-edge.
Set the bevel-square so that its blade will make an angle of sixty degrees with the edge of the piece, and mark the slopes on opposite sides, at the ends; saw and plane to these lines. This gives the ends of the pieces the shape of a gabled roof. Next, plane off the "gables," testing with the bevel-square as the planing proceeds.
Lay off and cut the two shorter pieces simi larly, with a distance of six and one-eighth inches between the lines.
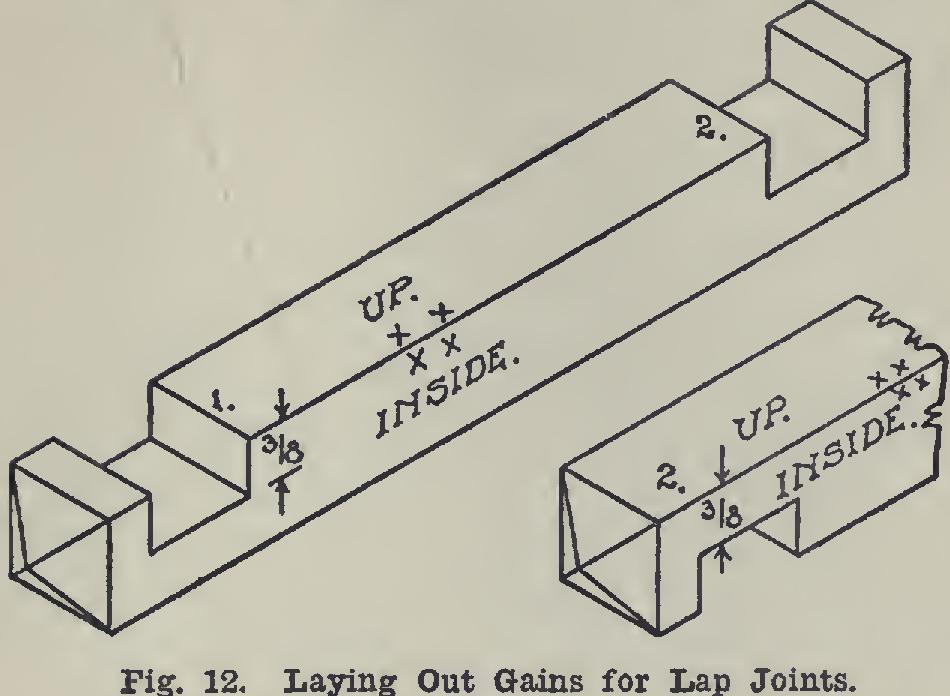
The next step is the laying-out and cutting of the gains which form the lap joints. Careful ness in this will insure success if the directions are followed. There is a reason for every direc tion, and every direction is based on the experi ence of many men for many years.
Place the two long pieces side by side, so that one set of face marks shall be in and the other set down, with the ends of the pieces even one with the other. Measure from the slope at each end a distance of one and one-sixteenth inches, and square knife lines across. Do not use a pencil, for pencil lines are not accurate enough.
Place the shorter pieces so that their face marks shall be in and up. Even the ends, and measure, and mark knife lines at points one and one-sixteenth inches from the slope.
Now lay the pieces in the positions they are to occupy relative to one another, with the faces either in or up, and number with similar num bers the two ends which make a joint, Fig. 12.
The next step is to get a second knife line across at each end of each piece, to show the length of opening.
It will be observed that the lines farthest from the ends were located first. This was done to insure having the inside of the frame a perfect rectangle, allowing whatever variation might be caused by the slight differences of thickness to come between the pieces and the ends of the pieces they crossed.
If the different pieces have been squared up as accurately as a good mechanic would square them, the proper length of opening may be measured and marked with knife and try-square.
If, however, they have been squared as the average boy will be able to square them, another method of marking will give better results. In deed, the second method is safer even for the practiced mechanic. Begin at some one corner, and place one of the pieces upon its correspond ing part so that the inside edge of one shall lie along the knife mark on the other; and, with the mark the size of the opening. Do not mark along the piece, but merely make a point, afterward squaring the line across at this point with knife and try-square.