A Book Rack
piece, fig, inch, cut, chisel, pieces, gauge and wood
If the parts have been properly numbered, each piece may be fitted so that it shall have but one position; and good joints may be secured though the pieces may vary slightly in size.
Now, carry these lines down on each side of each piece with knife and square.
Set the gauge to three-eighths of an inch, or to one-half of the thickness of the pieces, should they measure more or less than three-quarters of an inch, gauge on each side of each piece be tween the knife marks just made. The gauge block must, positively, be kept against the faces marked "Up" (Fig. 12); otherwise, unless the gauge should mark the middle of each piece ex actly, the surfaces would not be on the same level. Care should be taken to keep the gauge mark wholly between the knife marks, otherwise the marks will appear as ugly scratches when the finish is put on.
Fig. 13 shows the steps to be taken in cut ting the gains. With the back-saw, cut a kerf so close to the knife line that no wood shall re main between line and kerf. Of course the kerf must be kept upon the part which is to be chis eled. Fig. 13 (No. 1) shows the two kerfs. In sawing, begin at the far edge, pressing the thumb of the left hand against the saw blade to assist in guiding it; at the same time, grasp the piece with the left hand to steady it. Let the thumb rest upon the piece of wood, and do not allow it to move. Begin with short strokes, gradually increasing their length. The first stroke should be a backward one. Gradually lower the handle so that the saw may move in a horizontal position, sliding the thumb across the piece as the kerf lengthens.

Fig. 13 (No. 2) shows the manner of chisel ing. Keep the flat side of the chisel toward the gauge-line. Cut out a little at a time. Hold the chisel in a horizontal position, and swing the handle to the right or left as required by the grain of the wood. When near to the gauge-line, cut but half-way across, and finish from the other side. All cutting should be done across the grain—that is, horizontally—when the piece lies in the vise as in Fig. 13.
Through each end of each side piece, there should be bored a one-quarter-inch hole (Fig. 13, No. 1). Its center will be five-sixteenths of an inch from the side of the gain, and three-eighths of an inch from the upper surface. Locating and boring these holes must be done with the great est accuracy, to insure the proper folding of the uprights.
These pieces may be cleaned now and put together. The sandpapering must be very light ly done, else the pieces will cease to fit snugly.
A touch of glue in each joint will be sufficient. The parts may then be fastened with a hand clamp at each corner. If hand-clamps are not available, small brads driven from the under side will hold the parts together.
Square the two end pieces so that each shall measure five-eighths by four by five inches, the five inches being measured along the grain.
With a one-half inch radius, mark curves on the top corners (Fig. 14). On short curves like these, the wood rasp worked along the grain serves better than the spokeshave. The chisel should be used to remove most of the wood.
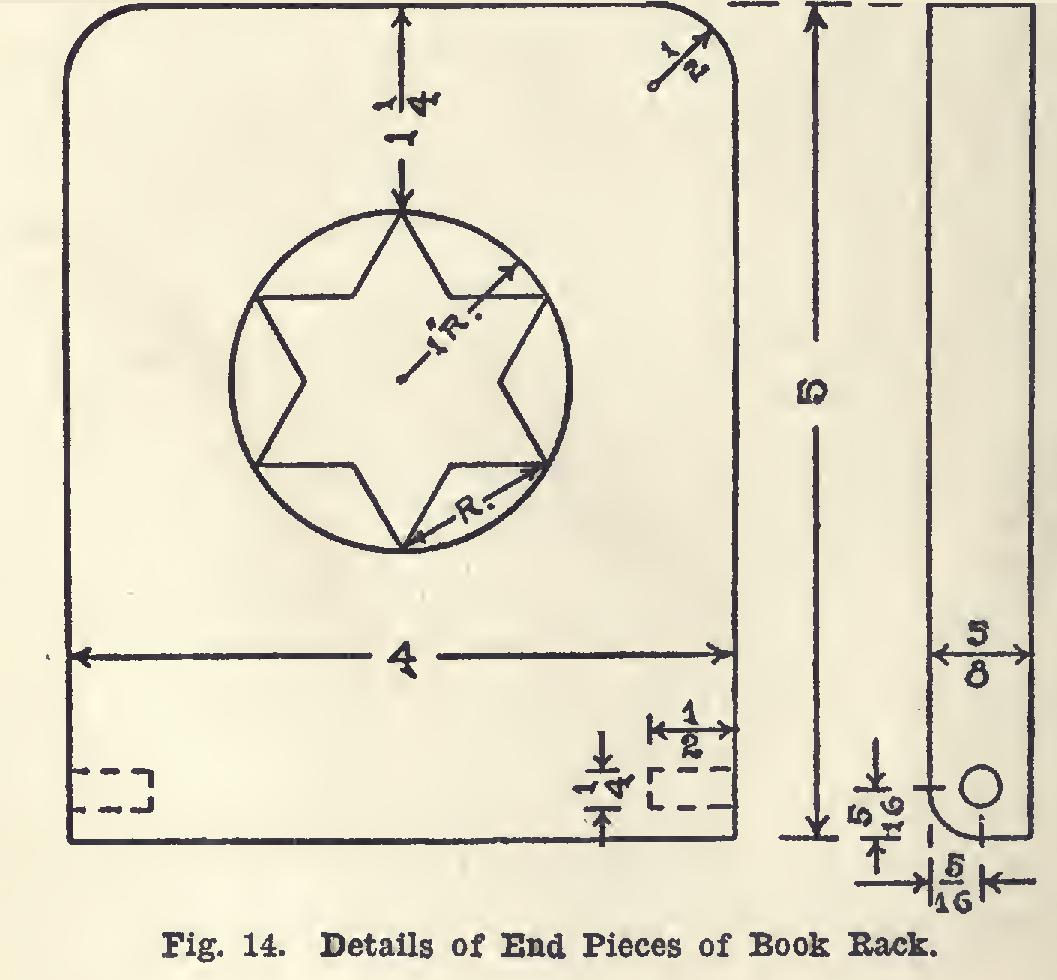
On the lower end, gauge with pencil lines five-sixteenths of an inch each way from an edge —that is, on the face and on the end. The rasp or plane may be used to round this (Fig. 14).
Five-sixteenths of an inch from the face, and the same distance from the lower end, center and bore, on each edge, one-quarter-inch holes to a depth of one-half an inch.
Sandpaper these end pieces. A design may now be placed thereon. In Fig. 14 is shown a six-point star in a circle. This design is easily made, and, when the space between the star and the circle is stippled, makes a neat appear ance.
Two and one-quarter inches from the top along the middle, gives the center of the circle. A one inch radius should be used. The points of the star are located by beginning at either top or bottom of the circle, and "stepping off" the circle with the one-inch radius. With a straight-edge, every point is connected to form the sides of the star.
The stippling looks best on hardwood such as oak or walnut. The tool can be made by filing the end of a common cut nail into four prongs. The outline can best be cut with a narrow chisel or with a veining tool. If the chisel is used, a very slight vertical cut carried along the line serves the purpose.
Make four dowels of one-quarter inch diame ter and somewhat longer than is necessary to fill the holes.
Apply whatever stain is to be used to the parts, before assembling. There are various good stains upon the market which, on a small piece such as this,' can be applied successfully by the amateur. A very thin coat of shellac applied when the stain has become dry will brighten the colors.
All that remains is to put the ends in place, insert the dowels, round the ends as shown in Fig. 11, and stain them. Experience has shown —and a final caution seems advisable—that only the most accurate marking and boring for the four dowels will give satisfactory results.