A Carpenters Bench
square, inches, legs, nails, edge and cross-pieces
A CARPENTER'S BENCH In response to requests for a plan and de scription of a workbench, the following is offered. This is the plan usually used by car penters. It makes a good, strong bench, and is one that can easily be built. It does not possess the beauty nor the advantages of benches such as are used in manual training rooms, but it will answer every purpose for home work.

For the bench shown in Fig. 116, there will be needed five pieces of one-inch stock ten inches wide by twelve feet long; one piece of the same' thickness and width, with a length of ten feet; one piece two inches by four inches by twelve feet. The one-inch stock may be pine, and should be mill-planed on two surfaces. The "two by four" should be mill-planed on four surfaces. It may be of pine also. The top, sides, cross-pieces, and legs may be got from these. There will be sufficient waste for the lower part of the vise.
For the vise, secure a piece of oak to one and one-half inches by five inches, with a length of two feet ten inches. It should be clean and sound.
Begin work by squaring a line across one side and one edge of the "two by four," as near the end as its condition will allow. Measure from this line two feet seven inches, and square a line across one side and one edge. Saw out this piece, sawing the end off first. Use this piece as a pattern, and mark off the length for the other three legs. Use the square to mark lines across one side and one edge at these points. A mechanic would probably saw the end of the pattern accurately enough so that a line made from it would make the use of the square un necessary; a beginner, however, would better use the square.
Next prepare the cross-pieces. Square one end of the ten-foot board; measure off two feet two and one-half inches, and again square a line.
Cut out four pieces like this in the same manner as was done with the legs. One edge of each of these pieces must be straight and square. If necessary, joint or plane them.
Two of these cross-pieces are to be fastenea to the narrow edges of the legs as shown in Fig.
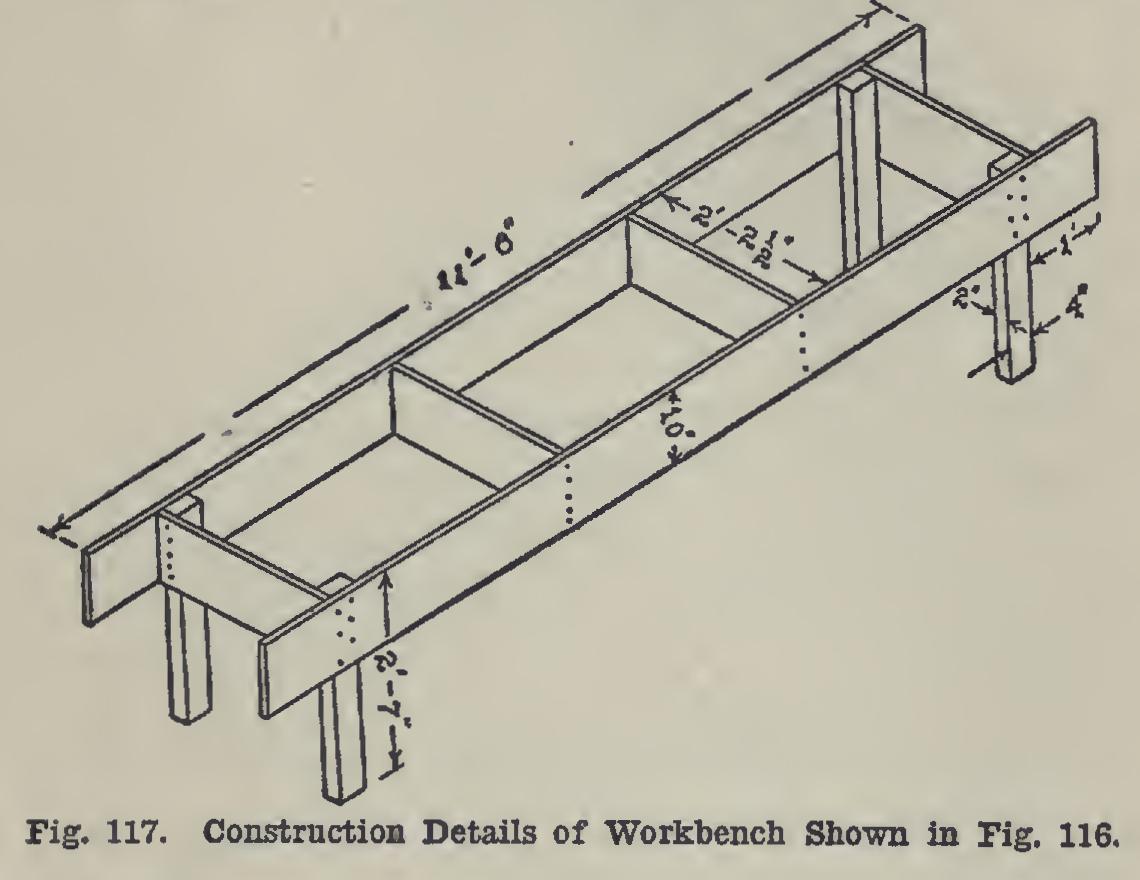
117. Place two legs on the floor, with their nar row edges up, and place a cross-piece on them. Fasten the cross-piece to the legs with one nail each. With the square, see that the side of the leg squares up with the edge of the cross-piece; then put in the rest of the nails. It is a pretty good plan to start all the nails into the board before attempting to nail any of them into the studding.
The side pieces may be prepared and placed now. Joint, plane straight, and square an edge on each of two twelve-foot boards. Square one end, measure eleven feet and eight inches, and saw to length. The second piece should be similarly cut.
From each end of each board, measure one foot, then three and three-quarter inches, and square lines across on outside of face and on joint-edge. This is to indicate the position of the legs.
"Start" the nails between these lines. Turn the legs "on side;" lay a side on them, and drive one nail home. Square the edge of the leg to the edge of the side piece—use the steel square —then drive the remaining nails. The other leg may be fastened, the frame turned so as to rest this side on the floor, and the other side placed and nailed.
Set the frame upon its legs, divide the space between the two end cross-pieces into three equal parts, and square lines across the sides to show where the other cross-pieces are to be placed. Start the nails, place the cross-pieces, and drive the nails home.
The three boards of the top must have each of their edges jointed. Two of them may be jointed irrespective of width, but the third must be so planed as to make the top the same width as the frame. Square the frame by placing the steel square against side and cross-piece.
Nail the outer top boards to the side pieces, as well as to the cross-pieces. Set all nails below the surface. Eight or ten-penny common wire nails will be about right for all the nailing.