A Porch Swing
pieces, inches, posts, inch, one-half, mortises and lower
A PORCH SWING Sooner or later the thoughts of most ama teur woodworkers turn to porch furniture. Plate 7 (B) shows a design for a porch swing. It can be made of hardwood and finished so as to show the natural grain of the wood; or it may be made of soft wood, such as pine, and given two or three coats of some appropriately colored paint. Hardwood will look prettier; but soft wood makes a lighter swing and therefore one more easily handled at the opening and close of the season.

If possible, get the stock mill-planed and sanded on four surfaces. It costs but little more. Stock could, of course, be got from the rough, if necessary. There will be needed nine linear feet of stock, surfaced on four sides to one and three-quarters by one and three-quar ters inches for the posts. For the lower frame or base, there will be needed two pieces sur faced on four sides (S-4-S) to one and three quarters by three and three-quarters, with a length of ten feet. Out of each may be got a side and an end.
The lower rail will require a piece one and one-eighth by three inches, with a length of ten feet six inches. The upper rail requires the same length and thickness with a width of four and one-half inches. The slats are five-eighths by three and three-quarters, and there will be needed about sixteen linear feet.
In the swing shown in the photograph, the bottom was made solid of one-half-inch stock. There will be needed for this about thirteen square feet. It need not be matched.
Begin by making the lower part, the base of the frame. Saw off—and square their ends with the plane—two pieces eighty-four and one-half inches long (Fig. 34). Bevel the ends about one-eighth inch or more as desired. For the end pieces, saw off and square two pieces to a length of twenty-two and one-half inches.
Since the weight of the swing comes upon the two long pieces, the short pieces need not be framed into them. To do so would be to weaken the long pieces unnecessarily. Two one half-inch dowels properly placed and glued in each end will serve to hold the parts together. If made of soft wood, even these may be dis pensed with, several spikes being used instead.
Their heads can be puttied up before the swing is painted. Care must be taken to spike low enough to keep clear of the mortises for the posts.
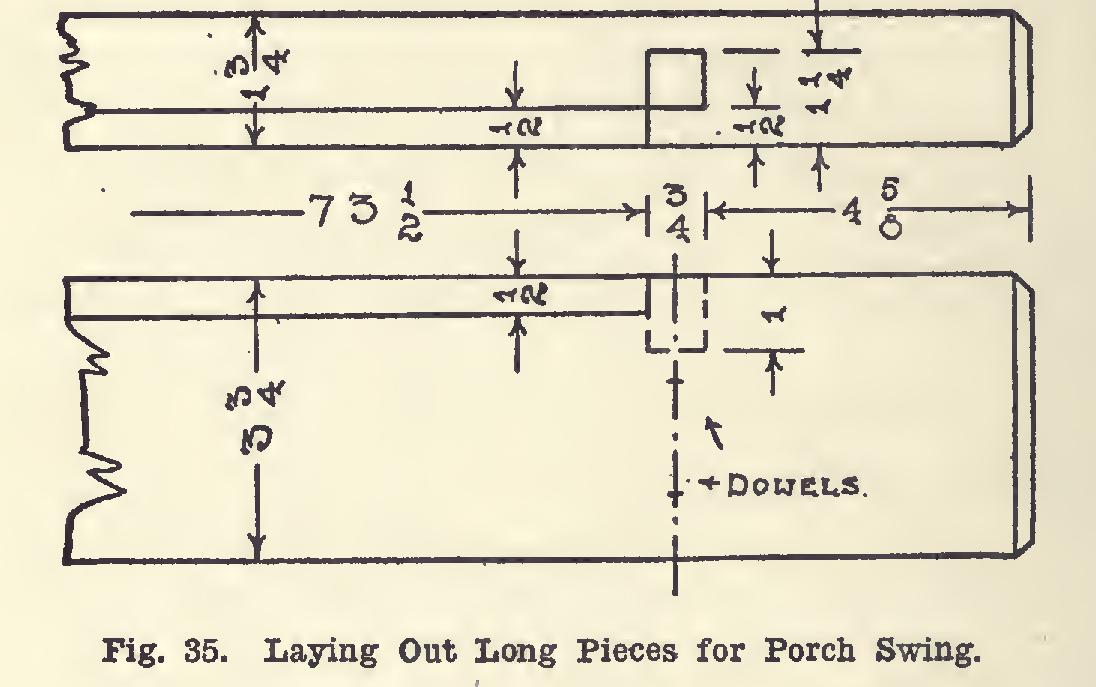
To lay off the two long pieces (Fig. 35), measure from the middle in each direction thirty-six and three-fourths inches; square knife lines across the top edges at these points. From these lines, measure toward the ends three-quar ters of an inch, and mark the second end of the mortises. The gauge settings will be one-half and one and one-quarter inches respectively. These mortises are for the tenons on the lower end of the posts to rest in, and are to be cut one inch deep.
There should be rabbeted from these four pieces, recesses the full length of the two short pieces, one-half inch on the edge by one-half inch down the faces, the inside surfaces. The two long pieces have the same sized rabbets, but these rabbets are to be but seventy-three and one-half inches long (Fig. 34). It will be neces sary to gauge and use the chisel to cut these rabbets at their ends.
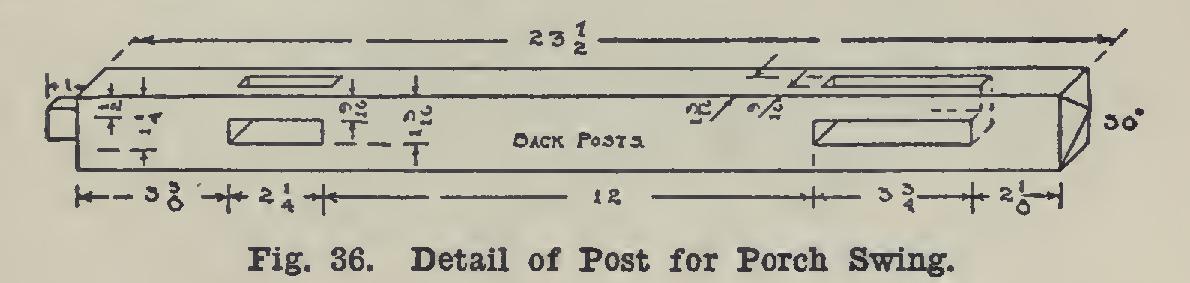
The posts (Fig. 36) should have one end of each sawed square. From these squared ends, measure one inch, then three and three-eighths, two and one-quarter, twelve, three and three quarters, two and one-eighth inches. This last point gives the location of the lower edge of the slopes which are to be made on the tops. But one post needs to be measured; the rest are to be marked by placing them alongside this one, evening their ends, and squaring lines across all at once. A sharp pencil should b9 used for this. The lines are to be carried across two sides of the two back posts. The shoulder lines are to be carried entirely around. On the front posts, the mortises enter from one side only of each. It is a good plan to set the posts up in the positions they are to have with refer ence to one another, and indicate in some way the approximate location of the mortises. The face sides should be made to turn in. The set tings of the gauge for the five-eighths-inch mor tises are nine-sixteenths and one and three sixteenths respectively. These mortises are to be cut fully one inch deep.