Convenient Bookshelves
inches, gauge, pieces, mortises, inch, one-half and square
CONVENIENT BOOKSHELVES Every boy possesses a few good books. The bookshelves shown in Plate 2 (B) will be found an excellent place in which to keep them.
The principal joint used is the keyed tenon. All stock is one-half an inch in thickness, and a board twelve feet in length by six and one-fourth inches or more in width is needed. It will be well to get stock which has had its two surfaces well planed to the required thickness.
Saw this board into six lengths. Three of them so that they may be squared to 6 inches by 22 inches; two of them so that they may be squared to 6 inches by 24 inches; and one of them to a width of 6 inches and a length of inches.
Square up the first five of these pieces in the usual way to the dimensions just given. The last piece may be squared for joint-edge and on two ends; the second edge need not be planed, as the irregular curve cuts it off entirely.
The stock from which to get the keys is of the same thickness as that of the sides and shelves, and, since the keys are so small, can probably be got from the twelve-foot board after the other pieces have been cut. Plane and scrape all surfaces nice and smooth.
The tops and bottoms of the side pieces may be varied from the square ends such as are shown in the photograph if desired. Various de signs will suggest themselves. Whatever design is chosen, let it be simple. The square ends have been found to work out nicely and are easily made.
To lay out the mortises in the side pieces (Fig. 3), place them side by side with their edges upWard and their ends evened. While in this position, fasten them in the vise, or clamp them together, so that both hands may be free to do the measuring.
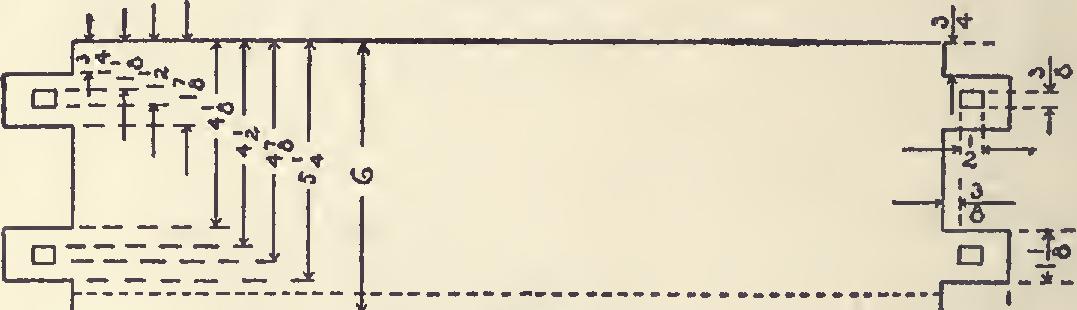
Begin at one end, and, with the rule and a sharp pencil, mark off consecutively the follow ing points: Two and one-half inches, one-half an inch, nine inches, one-half an inch, eight inches, and one-half an inch. There should re main three inches from the last point laid off to the end of the piece. At these points, square lines across the upturned edges of the two pieces.

Now, remove the pieces from the vise, and, with a try-square long enough to have its blade reach across the board, square sharp pencil lines across both surfaces to correspond with the lines just squared across on the edges. This work
must be done very accurately, care being taken to keep the beam of the try-square always against the joint-edge.
Set the gauge to three-fourths of an inch, and gauge between the pencil lines which were laid off one-half an inch apart.
Get in the habit of doing all the work which can be done with one setting of a tool. In gaug ing, for instance, there will be six places on each leg—twelve places altogether—which can be marked with one setting of the gauge.
Set the gauge to one and seven-eighths inches, and gauge as before. This lays out the sides of the mortises along the joint edge, the gauge block having been held against the joint edge.
To lay out the mortises along the other edge, set the gauge to four and one-eighth inches, and gauge between the pencil marks between which gauging was just done. Again, set the gauge to five and one-fourth inches, and repeat.
It will be observed that the dimensions just given require that all the gauging shall be done 19 ).1 I -fFig. 4. Detail of Shelves.
from one edge—the joint-edge. It might seem at first as if time could have been saved by gaug ing from each of the two edges instead of one, as the gauge would then require but half the re setting. The same is true of the gauging for the tenons (Fig. 4). The reason for the direc tions just given is that any variation in the width of the pieces will not affect the fitting of the tenons into the mortises. If the gauging should be done from each side, the mortises and tenons, though they would be of the proper size, might not fit at all, because of some variation in the width of one or both pieces.
These mortises may be made by selecting an auger bit somewhat less in diameter than the width of the mortise, and boring as many holes as possible without cutting the boundary. Fin ish with the chisel, beginning in the middle and working out towards the line. Cut from one side half-way through; then turn the piece over, and finish from the other side.