Convenient Bookshelves
gauge, inches, set, inch, tenons, cut and edge
There should be a rabbet cut in each leg at the top, in such a manner that when the shelves are put in position the legs will pair.
Set the gauge to one-half an inch, and gauge from what is to be the back edge, upon what is to be the inner surface of each leg, gauging from the point at which the middle of the top shelf will be when in position to the top of the leg (see Fig. 3).
Again, set the gauge to three-sixteenths of an inch, and gauge the same length of line upon the back edge, gauging from the inner surface, from the middle of the position of the top shelf to the top of the leg.
To lay out the shelves (Fig. 4), even the ends of all of them after placing them together with their edges upward. While in this position, measure from one end one and one-half inches, and mark; then nineteen inches, and mark, There should remain one and one-half inches to the ends of the pieces. Square lines across at these points.
Separate the pieces, and carefully square sharp pencil lines across the surfaces to corre spond with the lines squared across the edges, keeping the beam of the try-square against the joint-edge in doing so.
Now set the gauge to three-quarters of an inch, and, keeping the gauge-block against the joint-edge, gauge at each end, on each side of the piece, and on the ends as well. Set the gauge to one and seven-eighths inches, and repeat. This lays out the tenons next the joint-edge. For the remaining tenons, set the gauge first to four and one-eighth inches, then to five and one-quarter inches, and gauge as above.
It will be well to lay out the mortises for the keys before cutting out the tenons.
From the lines which mark the shoulders of the tenons, measure three-eighths of an inch toward each end respectively. From these points, measure one-half an inch toward the ends. Square sharp pencil lines through these points, the beam of the try-square resting against the joint-edge. These lines need not be carried entirely across the piece—just across the tenons.
Set the gauge to one and one-eighth inches, and gauge each surface at each end, gauging be tween the pencil marks just drawn. Again, set the gauge to one and one-half inches, and gauge as before. Now, set the gauge to four and one half inches, and, still keeping the gauge-block against the joint-edge, mark the remaining tenons. Finish by setting the gauge to four and
seven-eighths inches. These mortises may be bored and cut as were those in the side pieces.
Out the tenons with the saw, the shoulder between the tenons being cut with the turning saw, and trimmed to the line with the chisel.
The top shelf has a rabbet cut on the upper surface and back edge. Set the gauge to three sixteenths of an inch, and, with the gauge-block against the upper surface, gauge a line on the back edge the entire length of the board. Again, set the gauge to one-half an inch, and, with the gauge block against the back edge, gauge a line on the upper surface the entire length of the piece.
The manner of cutting this rabbet is the same as that to which reference has previously been made. The dotted lines (Fig. 4) indicate this rabbet. It is cut in the upper shelf only.
The keys (Fig. 5) are cut from stock planed to three-eighths inch. A joint-edge is obtained, and one end squared. The length, one and one half inches, is marked from this end, and the second end squared. Measure from the joint edge at one end one-half an inch; at the other, five-sixteenths inch; and connect these points with a straight line. This line gives slope for remaining edge. Twelve keys will be needed.
Another way, if the stock is in shape to allow it, is to joint up two edges, then lay out all the keys at once in such a way that the cut of the slope on one key will make the slope for another.

Of course, room for the saw cut must be allowed in the laying off.
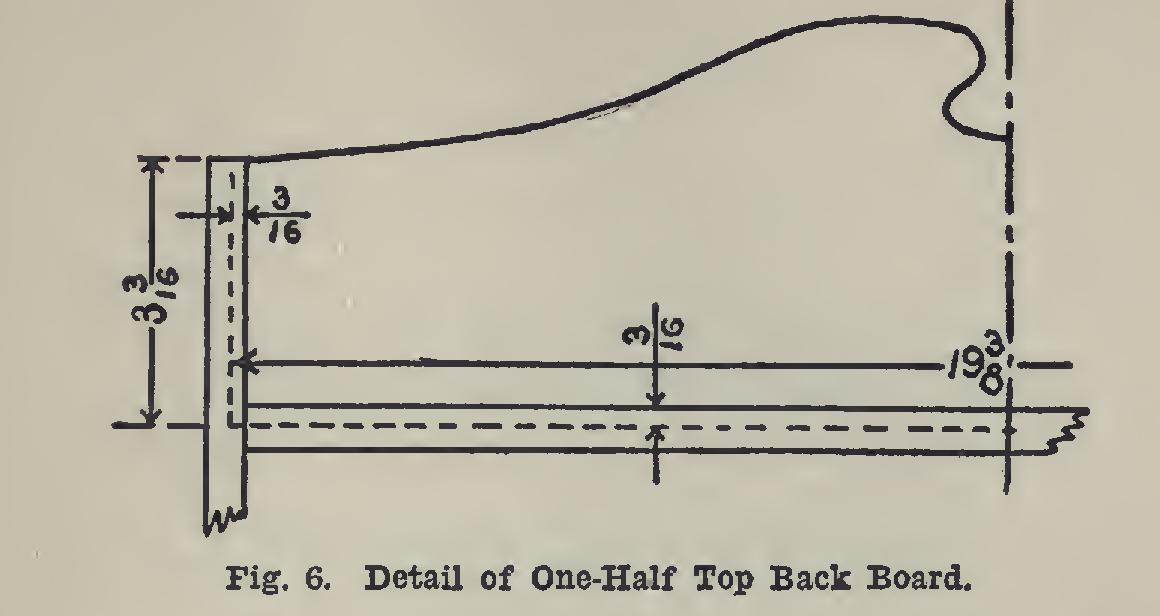
The board for the back (Fig. 6) should have an edge jointed and its ends squared. It should be nineteen and three-eighths inches long. At the ends it must be three and three-sixteenths inches wide. The rest of the width will be deter mined by the design used.
For the freehand design (Fig. 6), make one half freehand; fold on the center line, and trace the second half, getting the parts alike. Make the drawing full size. Place the completed de sign upon the wood, using carbon paper. Cut the design with the turning saw and smooth with scraper, spokeshave, and file.
A good modification of the structural design of the shelves would be to put the middle shelf in with a gain instead of the keyed tenons.