Hanging Clock of Mission Design
inches, square, pieces, length, lines, stock and posts
HANGING CLOCK OF MISSION DESIGN The hanging clock in Plate 20 (B) makes an appropriate piece for office or home. Weights furnish the motive power. This clock must be fastened firmly to the wall, and be properly lev eled and the movements adjusted if the best results are to be expected. Fig. 99 is a detailed thawing, giving dimensions.
There are two ways of fastening the parts together, with lag screws and square butt joints with small dowels, or with lag screws and stub tenons. The latter makes the best work, but the former is easier. The second method is advised, and will be described.
We may begin by making the four posts square, in the usual manner, two pieces to a width and thickness of one and one-half inches each, with a length roughly sawed to forty-three inches. These are for the back posts. Square two more pieces for the front posts to the same width and thickness, but with a length of twenty nine inches. Point one end of each of these pieces to an angle of forty-five degrees. Use the bevel-square in making the slopes and in test ing, and do not work by guess. Measure from the end of each piece about a thirty-second more than three-quarters of an inch; and square light, sharp pencil lines around the four sides, remem bering to keep the try-square handle against the joint-edge or working face. These lines give the shoulders for the slopes. From these lines, lay off the slopes on opposite sides. Saw close to these lines, and plane smooth. Locate the mid dle of the resulting ridge, and again saw and plane. To set the bevel-square to forty-five de grees, hold the handle against the beam of the steel square, and move its blade until it marks the corresponding figures on beam and blade. From these shoulders, measure forty and three quarters inches on two of the pieces, and square lines around for the shoulders. On the other two, measure twenty-six and one-half inches. Shape these ends as were the others.

Before laying out or cutting the mortises, the other stock may be squared up. The cross bars are of seven-eighths-inch stock. Square up for the front and back five pieces to a width of one and three-quarters inches and a length of fifteen inches. As these bars all have tenons on
the ends, it is necessary to saw them only; they should be sawed carefully, however.
While the seven-eighths-inch stock is out, cut and square four pieces to an inch and three quarters, with a length of nine and one-half inches. Also square four pieces of the same stock to a width of one and one-eighth inches and a length of nine and one-half inches. These eight pieces are for the cross-bars on the sides of the clock.
The vertical bars are of three-quarters-inch stock, and there will be needed six pieces with a width of three-quarters and a length of thirteen and three-eighths inches for the sides. For the front, there will be three pieces three-quarters inch square, with a length of four and one-half inches.
The two braces are to be one and one-eighth inches square, with a length of fourteen inches.
The slats for the back are to be made of three-eighths-inch stock, squared to a width of two inches and a length of forty and three-quar ters inches. There will be three of them.
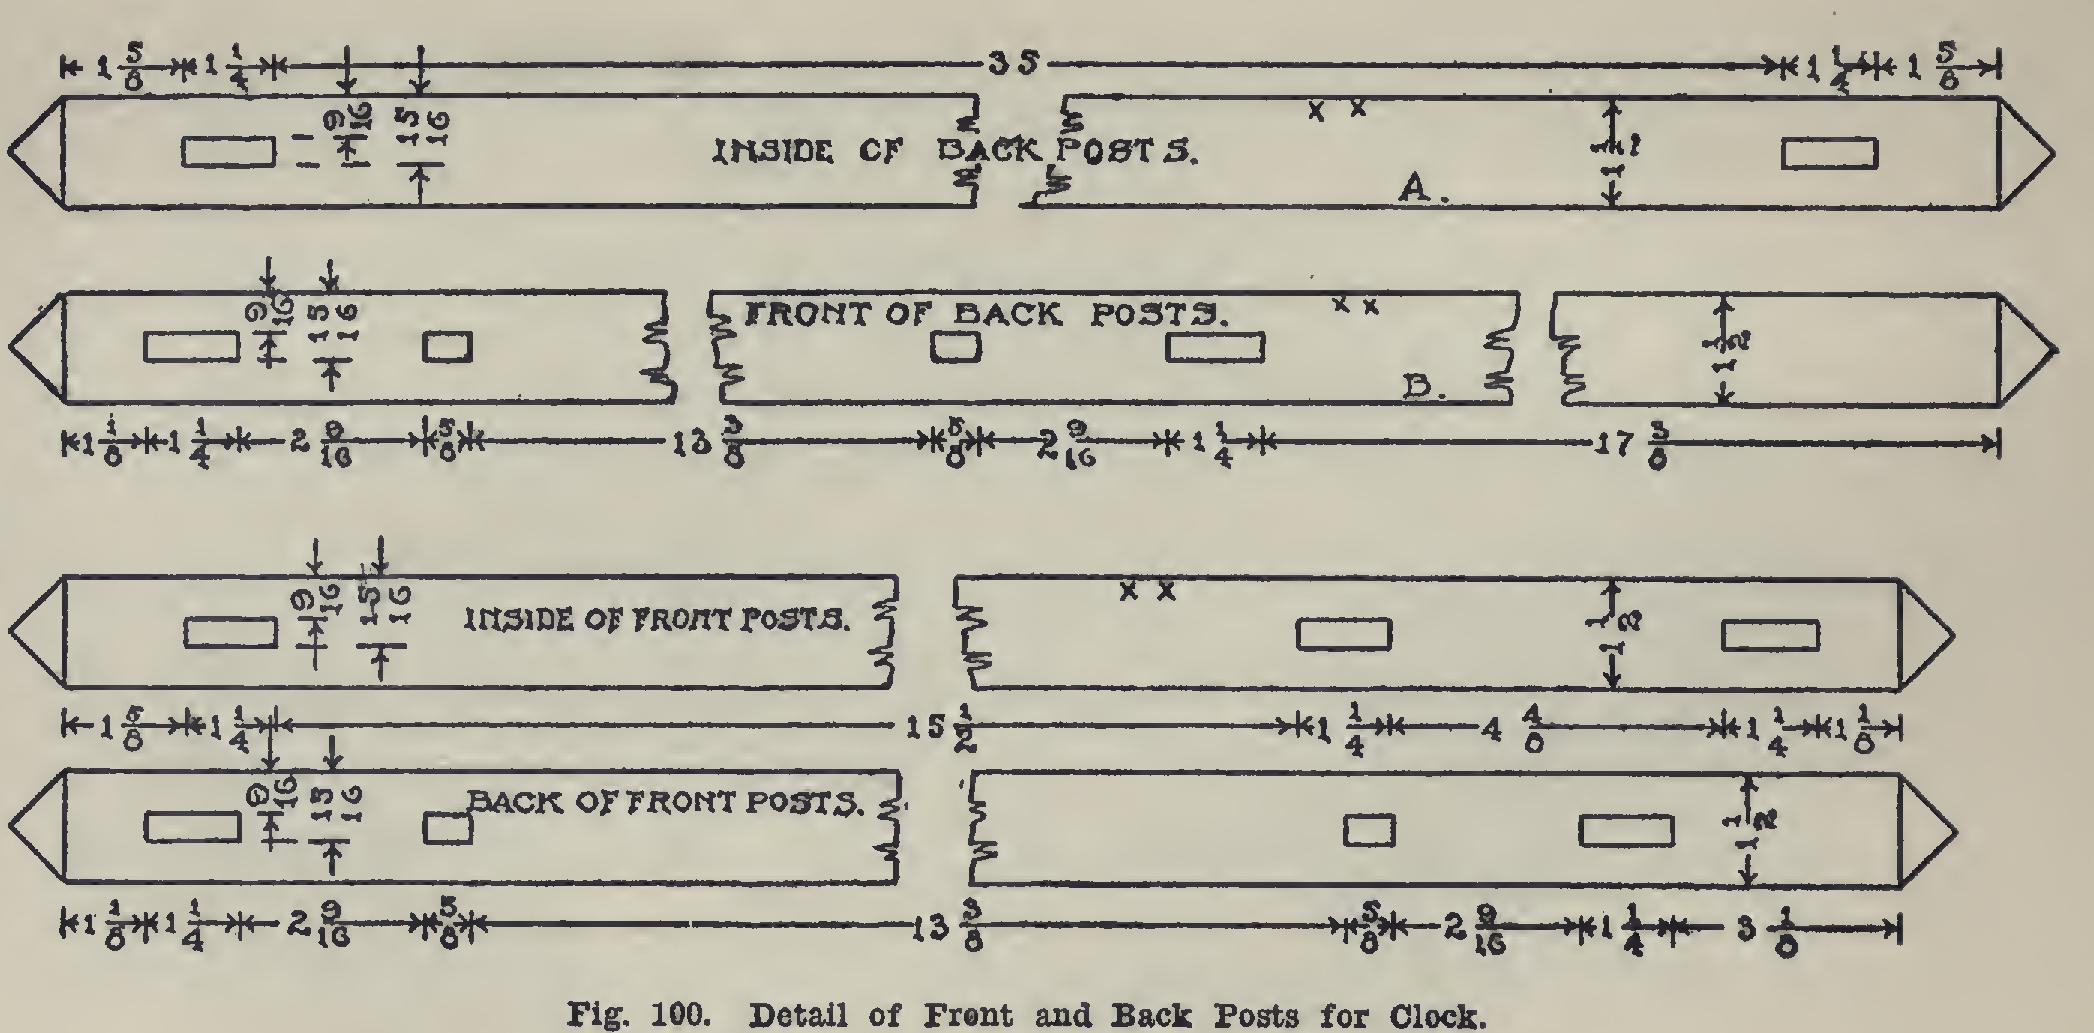
Fig. 100 shows the manner of laying out the mortises on the posts. Place the posts as they are to go, and mark roughly with pencil the ap proximate positions of the mortises. The face marks are to be turned in. Now lay the two long pieces (Fig. 100, A) on the bench, and even the top ends at the shoulder of the bevel with the try-square, keeping the inside surfaces of the back posts upward. Begin at the top bevel, and measure one and five-eighths inches, then one and one-quarter inches, thirty-five inches, and one and one-quarter inches. If no mistake has been made, one and five-eighths inches will re main. Square sharp pencil lines across at these points.
Place the same pieces (Fig. 100, B), with the front surfaces upward; even the top ends; and mark off one and one-eighth inches, one and one-fourth inches, two and nine-sixteenths, five eighths, thirteen and three-eighths, five-eighths, two and nine-sixteenths, and one and one-quar ter inches. There should remain seventeen and three-eighths inches. Square sharp pencil lines across at these points.