Library Table of Mission Design
inches, line, square, measure, gauge, fig, inch, one-half and set
While waiting for the glue to harden, the mortises may be cut. In order that no mis takes shall be made in placing them, set the legs upright in the positions they are to occupy rela tive to one another with the xx sides (Fig. 22) facing outward; and mark in some way their approximate location.
Place the legs side by side, with those sides into which the tenons of the cross-rails or ties enter so that they shall face upward. Even the ends, using the large square. Measure from the lower ends of the legs five inches, and square a light pencil line across the four pieces. From this line, measure two and three-quarter inches, and square another line across the pieces.

While the legs are in this position, measure from the top one and one-half inches, and square a line across. From this line, measure four and one-half inches, and repeat.
Now turn up the sides into which the long rails are to enter their tenons, and mark, meas uring first one and one-half inches, then four and one-half inches, as was just done. These marks locate the ends of the mortises.
For the lower mortises (Fig. 22), set the gauge first to one and nine-sixteenths inches, and gauge. Next set the gauge to two and three-sixteenths inches, and complete the mark ing of these mortises. Remember that all gaug ing is done from the xx sides. For the top mortises (Fig. 23), set the gauge first to one and one-eighth inches, then to one and five-eighths inches.
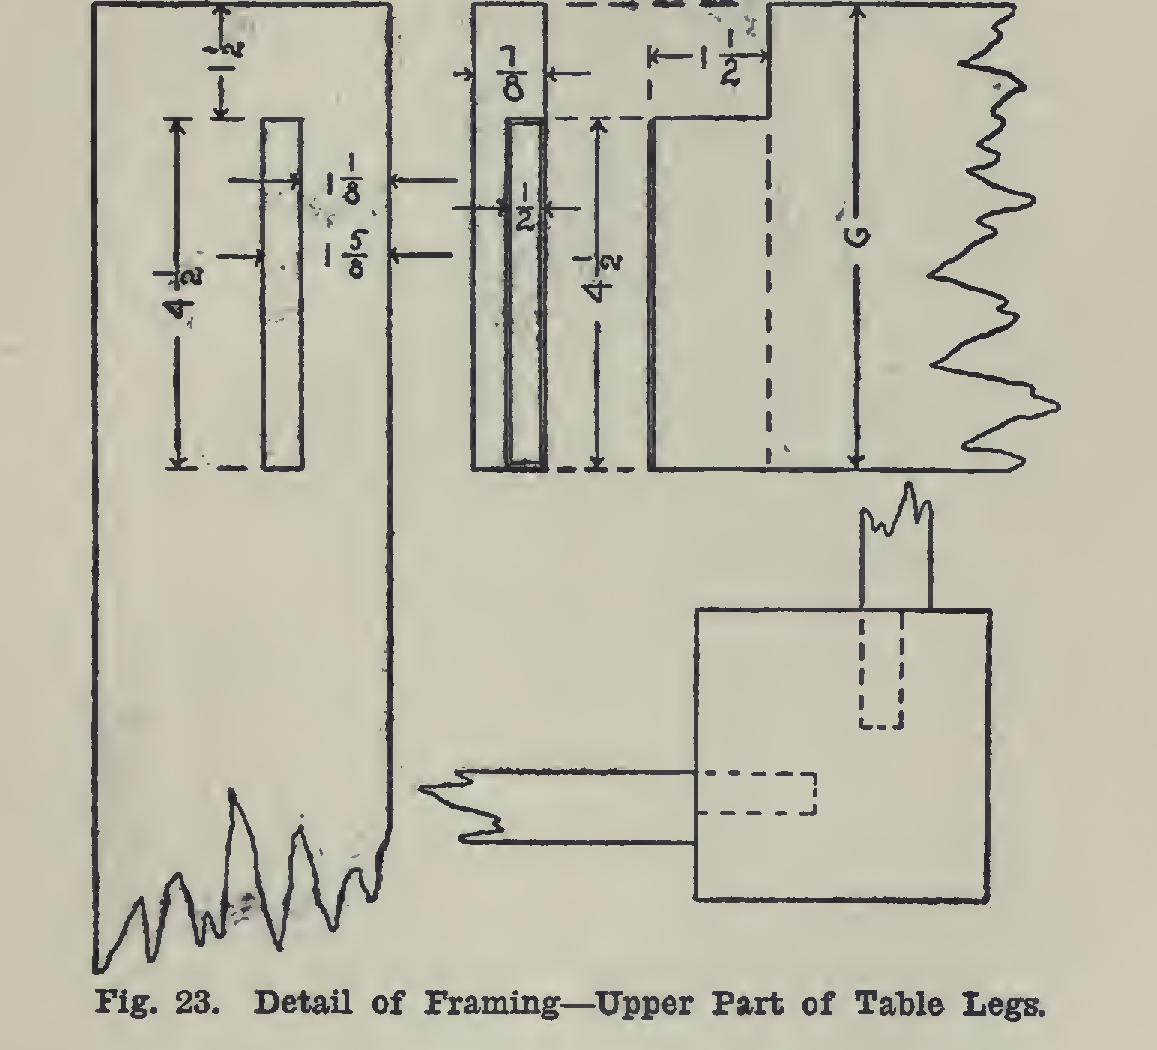
The mortises at the top of the legs are to be cut to a depth of one and one-half inches; those at the bottom, to two inches.
The tenons on the rails are cut with a length of one and one-half inches. They are shouldered on one side and one edge. The gauge should be set first to one-half an inch, then to four and one-half inches (Fig. 23), the gauge-block being held against what is to be the inside surface for the first marking, and against what is to be the under edge for the second marking.
The tenons for the lower rails or the ties are to be two inches long, and are to have shoulders on all sides (Fig. 22). The gauge is set to one fourth of an inch, then to seven-eighths of an inch, the block being held against the side which is to face outward. Next set the gauge to one half an inch, then to three and one-quarter inches, gauging from the edge which is to face upward.
Much time can be saved by using a mortise gauge—a gauge having two spurs. By means of this tool, both sides of a mortise can be marked at the same time.
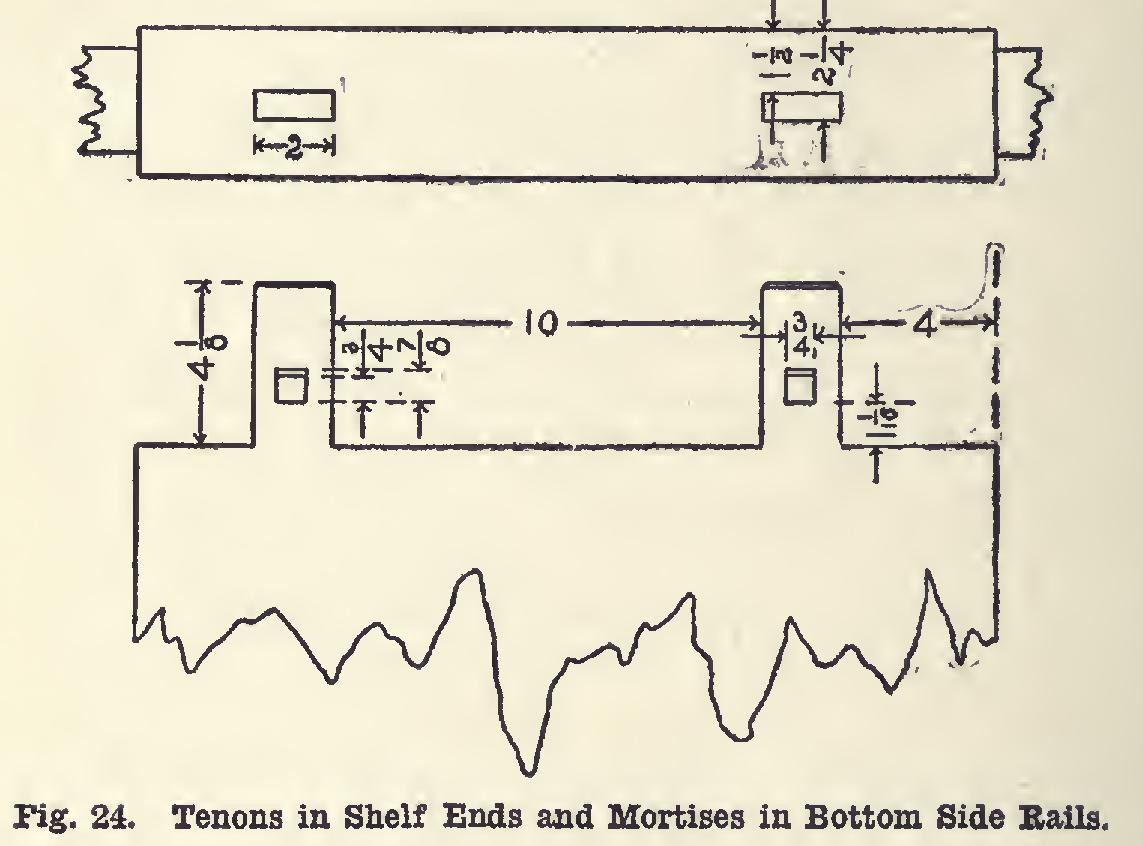
The keyed tenons (Fig. 24) are laid out by measuring from one end of the shelf a distance of four and one-eighth inches, and squaring a line across at this point. Along this line, meas ure from the edge of the shelf consecutively Your inches, two inches, ten inches, and then two inches. There should remain four inches be tween this last mark and the remaining edge of the shelf. At these points, carry out lines towards the end, which shall be at right angles to the cross-line. The steel square can be used
to do this.
Repeat these measurements at the other end of the shelf, making sure of a distance of thirty six and one-eighth inches between the two cross lines. Cut as shown in Fig. 24.
The mortises in the ties (Fig. 24) which are to receive their tenons, are laid off by measur ing from the shoulder at the end of the piece four inches, and squaring a sharp pencil line across. Carry this line down on the two sides of the piece. From this line, lay off another at two inches, again at ten inches, and then at two inches. There should remain four inches to the nearest shoulder.
Set the gauge to one and one-half inches, and gauge between those lines which are two inches apart, gauging from the joint-edge. Both sides of each piece should be marked. Again, set the gauge to two and one-fourth inches, and gauge from the joint-edge.
The mortises (Fig. 24) in the tenons made on the shelf are to receive the keys. To lay them out, measure from the shoulder of the tenon one and one-sixteenth inches, and square a light pencil line across the tenon. With the try square, carry this line around on the other side of the tenon. Now measure from this line, measuring towards the end of the tenon, seven eighths of an inch, and square a line across on the top side only. On the under side, measure but three-quarters of an inch.
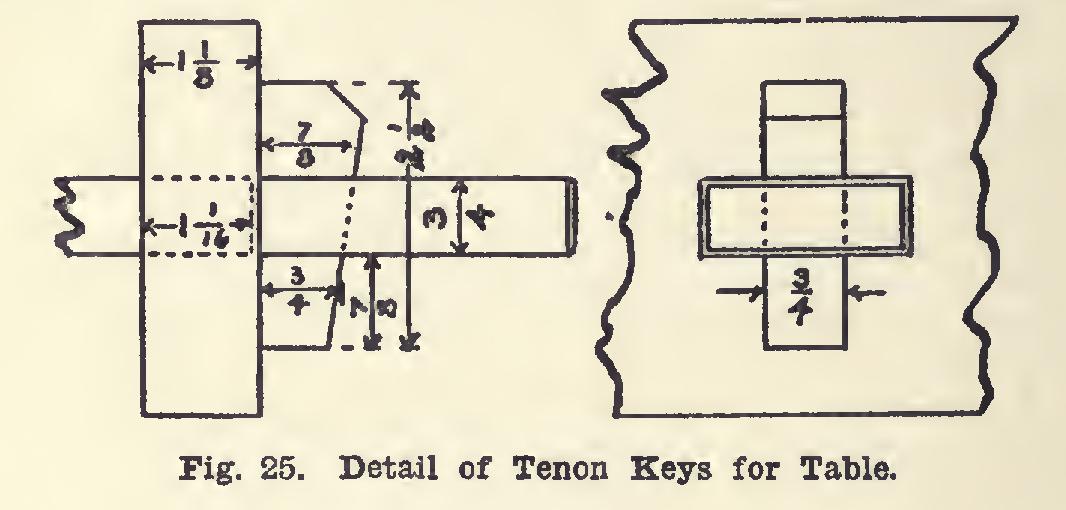
Find the middle of the tenon, and measure three-eighths of an inch to each side. With the steel square placed so as to make a true per pendicular to the cross-line which forms the shoulders of the tenons, pass lines through the two points just located.
The key can be made of three-quarter-inch stock. Square up one edge and two ends, mak ing a length of two and one-half inches (Fig. 25).
From one end, measure up seven-eighths of an inch, and square a line across. Measure out from the jointed edge along this line three quarters of an inch, and place a joint.
From the line just squared across the key, measure up three-quarters of an inch, and square another line across. On this line, measure from the joint-edge seven-eighths of an inch. Through the two points thus located, draw a line. Plane to this line.
Chamfer the corner at an angle of 45 degrees as shown in Fig. 25, the amount of chamfer being optional.
Fasten the top from its under side to the rails. Small angle irons such as can be found in any hardware store will serve.
Finish by staining the color desired. Rub lightly, when dry, with fine sandpaper, to re move the slight roughening of the wood caused by the stain. Apply paste filler of a color to match the stain. After the filler has thoroughly hardened, apply two or three coats of wax, rub bing each coat well, If desired, the ends of the table may be improved by the addition shown in the photo graph, Plate 5 (B).