Settle of Mission Design
inches, mortise, rail, inch, gauge, tenon, rails, one-half and wide
The chisel should be sunk the full depth of the mortise as soon as possible—in this case one and three-eighths inches. In making the last cut, or the cuts near the end of the mortise, care should be taken not to mar the sharp edges of the mortise by prying on them. The worker should stand so as to look along the mortise; only in this way can he sight the chisel plumb and get the sides perpendicular.
Another way to cut the mortise—and a better one where the mortises are of consider able size—is to bore a series of holes as close together as possible, using a bit of a diameter almost equal to the width of the mortise. They should be bored the full depth of the mortise. This can be told by fastening a stop to the bit, or measuring the distance from the wood to the brace, subtracting the required depth from the distance measured from lip, or cutting edge, of the bit to the brace, will give the dis tance wanted.

The sides, then the ends, are cut with the chisel, care being taken to stand so as to sight the chisel plumb.
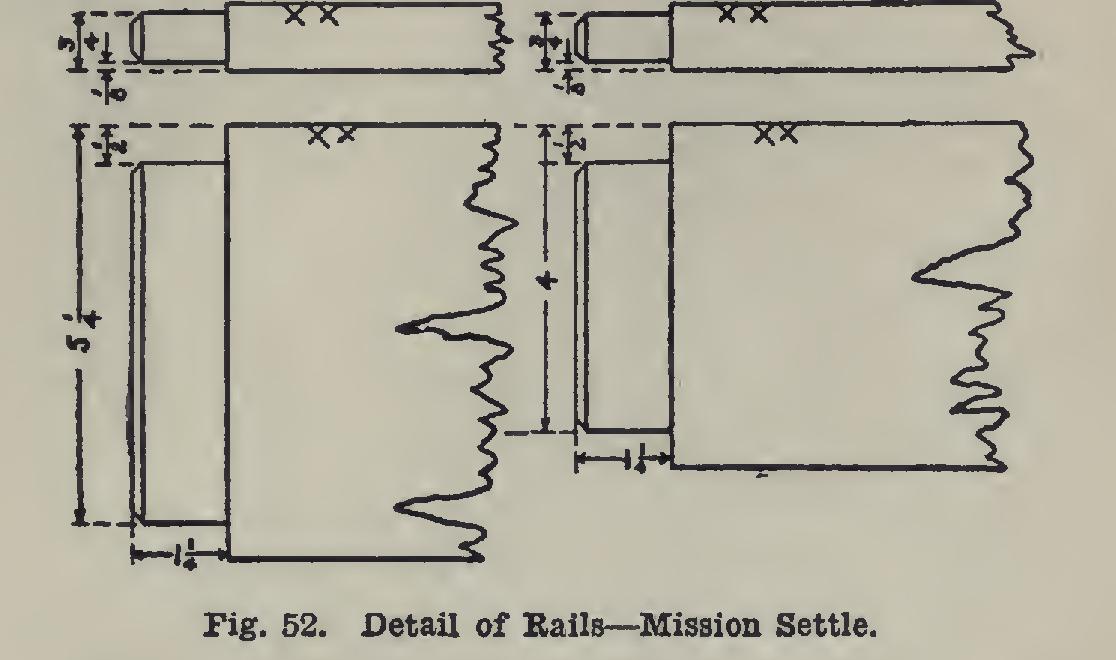
The rails should be got from seven-eighths inch stock. Square up two pieces five and three-quarter inches wide by forty-four and one-half inches long; two pieces five and three quarter inches wide by •twenty-three and one half inches long; one piece four and one-half inches wide by forty-four and one-half inches long; two pieces four and one-half inches wide by twenty-three and one-half inches long. On the ends of these rails, the tenons (Fig. 52) are to be cut.
To lay off the tenons on the five and three quarter-inch rails (Fig. 52, left), measure back from one end one and one-quarter inches, and square a knife line entirely around the rail. Be sure to keep the beam of the try-square against the joint-edge and working face only, in doing this. Set the gauge to one-eighth of an inch, and, keeping the gauge-block against the working face, gauge on the two edges as far back as the knife lines, also on the end of the rail. Next, set the gauge to three-quarters of an inch, and gauge from the same face and on the same edges and end. Set the gauge to one-half an inch, and gauge from the joint-edge on the sides of the rail and on the ends. Now set the gauge to five and one-quarter inches, and gauge from the same edge and on the same sides and end as were just used. This lays out a tenon five eighths of an inch thick by four and three quarter inches wide, by one and one-quarer inches long.
The tenons on the rails whose width is four and one-half inches (Fig. 52, right), are sim ilarly laid out, the gauge being set at four inches, however, in marking the width of the tenon, instead of five and one-fourth inches.
Measure from the shoulder of the tenon laid out forty-two inches, to locate the shoulder of the tenon on the other end of the long pieces, and twenty-one inches on the short pieces. Lay off the tenons as was done on the first end, work ing from the shoulders instead of the end of the rail. Place the rail upright in the vise; and
with the back-saw rip carefully to the gauge marks. Next crosscut to the knife lines. On: account of the small amount of stock to be taken' off the broad surface, a chisel will answer better than the saw. With the chisel, bevel the end of the tenon about one-eighth of an inch, to insure its starting into the mortise easily.
It will be necessary to fit every tenon into its mortise; and, to avoid confusion, every tenon should be given a number, and the correspond ing number placed on the mortise. When num bering, set the legs in position relative to one another, and lay the rails in their corresponding places. The rails should have the XX marks up and out.
Sandpaper, after having planed and scraped, the legs and rails. Then put together one end of the settle. Glue the tenon with warm glue, if it can be obtained, just before inserting it in the mortise. Cabinet-maker's clamps should be used to draw the framework together, blocks of wood being placed between the clamps and the settle to distribute the pressure more evenly. See that the shoulders of the tenons fit up on all sides, and that the rail is square with, or makes a right angle with, the leg. Put the other end of the settle together in like manner.
After allowing the glue time to set, put the long rails in place. With a stick, measure one of the diagonals of the frame, the distance from one of the front legs to the back leg on the other end of the settle; then measure the other diagonal, and move the frame until the two diagonals are equal. This squares up the frame.
Unless you have good joints and good glue, it will be advisable to pin the tenons by boring two three-eighths-inch holes, each one inch from a line squared around from the end of the mortise, and five-eighths of an inch back from the surface which contains the mortise. Bore to a depth sufficient to pass well through the tenon (Fig. 51). Insert three-eighths-inch dowel pins in these holes, and cut them off flush with the surface. This ought to be done before the clamps are removed.
Fit a piece seven-eighths of an inch thick by four and three-quarter inches wide inside of the front rail, flush with the bottom of it. Fasten it to the rail with screws. In like manner, fit and fasten one to the rear lower rail. To these pieces, fasten with nails eleven slats two inches wide by one-half an inch thick (Fig. 50).
Place casters under the legs.
The design illustrated in Plate 11 (B) was purposely made simple in its construction, therefore severe. It can easily be modified by those who are good workers. Plate 12 shows one style carried out, using slats in the back and sides mortised into the top rail. This makes a very valuable piece of handicraft furniture.