Cornice Construction
gable, roof, cut, fig, pieces, plancher and cuts
CORNICE CONSTRUCTION A good form of cornice that is very popular, especially for cottages, is shown in detail in Fig. 18. It is what is known as a boxed cornice.

It represents a very easy method of construct ing cornice and gutter where the bottom of the roof is concaved. Many will put on the rafters to form the concave portion of the roof, but this is not at all necessary. The concave portion can be made much easier and quicker by cutting in 2 by 3 pieces as shown, and placing the sheathing boards so that the center of the boards will break over the joints of the 2 by 3 where it connects with the rafters and lookouts. Then, when the shingles are put on the roof, they will have just as nice a curve as can be made in any way and at much less cost.
It takes much less time to put in these 2 by 3 pieces than to work out the circular pieces, and Fig. 19. Cornice Construction.

then the trouble with hips is much less with the straight pieces than it is where hips have to be worked to the circular form. The straight pieces for the hips have to be a little longer than those on the common rafter, but this is very easily found in more ways than one. A little sketch will show it, or it can be figured out mathematically.
Other good cornices are shown in Fig. 19. As illustrated, they are box cornices. No. 1 and No. 3 could be used very easily as open cornices—now so popular for bungalow con struction—by simply omitting the plancher boards and moulding, the roof sheathing boards at the eaves having been matched and the rafter ends dressed and fashioned as desired.
Where two roofs come together with a valley, it is often a question just how the rafter ends should be cut, square or plumb with the build ing. If it is a cornice like No. 1, it is proper to cut the ends at the rafters square; but if it is a box cornice like No. 2, then the crown mould should be set plumb. A cornice like No. 3 will not work well where there are gables, because the crown-mould will not member with that of the gable.
How to Join Members of Cornice. A point that frequently gives trouble is to connect cornice on a frame house where a gable end is flush with the side of the house. This, making the fascia mould member with a like mould on the raking cornice, cannot be done, because the mould on the fascia of the gable is resting on a plumb backing, while that on the raking cornice is at right angles to the pitch of the roof. Con
sequently, they cannot directly member without making a return connecting the two, as in Fig. 20. This can be very small, just enough to fill the inverted V-shaped gap, where the top edge of the two are on a line, or it may be got over by letting the gable extend a few inches so as purposely to make the return longer and thereby destroy what otherwise may seem to be a blunder on the part of the workmen.
There is another point in connection with a roof of this kind that we wish to call atten tion to, and that is the cut on the plancher of the gable to member with that of the raking cornice. We have seen carpenters who could readily frame a hip and valley roof, but when they came to make the above cuts, were puzzled to know how to apply the square.
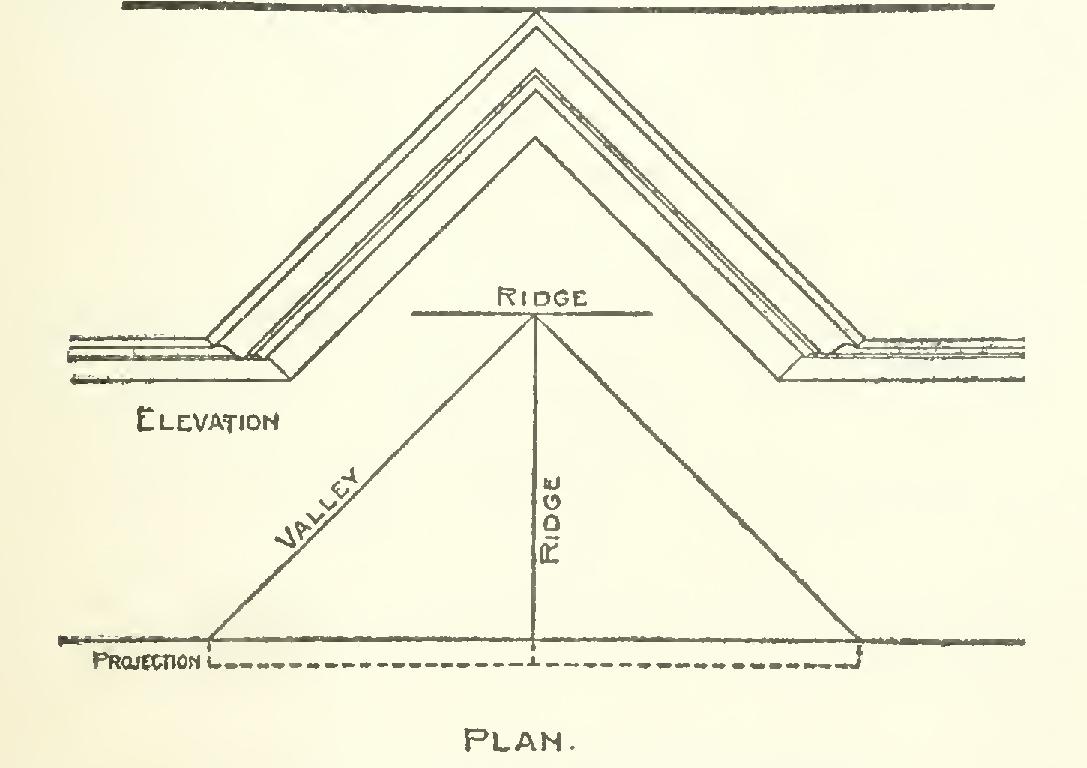
Fig. 20. Gable Flush with Side of House.
The trouble is in this, as in most all other framing problems: they did not stop to think. We make haste sometimes by going slow, and this is one of the _times.
Now, let us stop and think. To begin with, the plancher of the gable lies in exactly the same position as the jack rafter. Consequently, the figures that give the plumb and side cuts of the jack will give the cuts for the plancher, but are reversed; that is, the plumb cut becomes the edge cut, and the side cut becomes the face cut across the board. As for the cuts of the raking plancher, it lies in exactly the same posi tion as the roof board just above it, consequently the same figures that are used for the roof boards will give the cuts for the plancher.
Putting in Show Blocks. Fig. 21 is a sketch showing a way of putting in show blocks in a gable end. The way they are commonly put Fig. 21. Two Methods of Putting in Show Blocks.

in is always more or less of an annoyance. In the sketch, both the common and approved ways are shown. In the common way, the blocks are pieces of 2 by 4, cut in between the gable studs, which, if not extremely well nailed, will become loosened in nailing on the siding. In the other way, the blocks are in one continuous piece, fastened in the center to the gable stud just low enough to receive the siding and cornice.
While this plan may be old to some, it may be new to many. It is often some of the simple things that are of much importance.