Open-String Stairs
string, riser, tread, nosing, cut, fig, stair and mitered
OPEN-STRING STAIRS. Now taking up the stair which has one side open—that is, the string farthest from the wall, which is the face string— Fig. 77 shows a plan and side elevation of such a string. The treads and risers are housed the same as in the other stair, but the string must be made somewhat differently to fit the condi tions.
W.S. shows the wall string; R.S. the rough string placed there to give the structure strength; and O.S. the outer or cut string. At a,a, the ends of the risers are shown; and it will be noticed that they are mitered against the vertical or riser line of the string, thus prevent ing the end wood of the riser from being seen. The other end of the riser is in the housing in the wall string. The outer end of the tread is also mitered at the nosing, and a piece of stuff made or worked like the nosing is mitered against, or returned at the end of the tread.

Fig. 77. Plan and Elevation of Open-String Stair.
The end of this returned piece is again returned on itself back to the string, as shown in the upper portion of the cut, at n. The moulding, which is a five-eighths cove in this case, is also returned round the string and into itself.
The mortises shown at the black points, B,B,B, etc., are for the balusters. It is always the proper thing to saw the ends of the tread ready for the balusters before they are attached to the string; then, when the time arrives to put up the rail, the back end of the mortise may be cut out, when the tread will be ready to receive the baluster. The mortise is dovetailed; Fig. 78. Miter Joints for Open Stair Work.
and, of course, the tenon in the baluster must be made to suit. The tread is finished on the bench; and the return nosing is fitted to it, and tacked on so that it may be taken off to insert the balusters when the rail is being put in position.
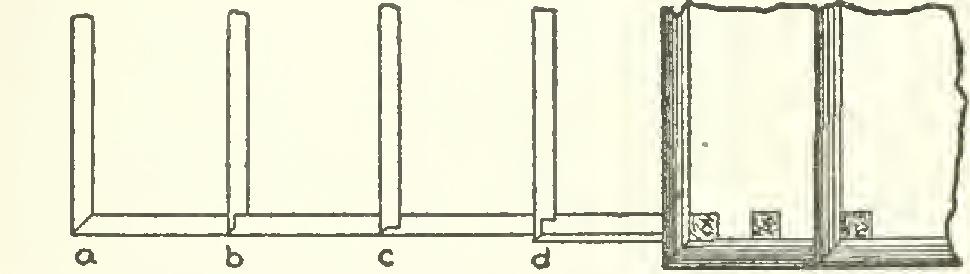
In an open stair, and especially one in which the treads project over the face of the string, it is desirable to have the work rather well fin ished in order to present an attractive appear ance, one that will harmonize with its surround ings. In the modern dwellings of to-day, the front hall or the stair hall is made larger than is necessary to accommodate merely the stair. The reception hall and stair hall are combined, and appropriately so; but it is necessary then to finish the room more elaborately than if it were used as a stair hall only. One thing to be provided for is that no end of any piece of wood shall show. In order to accomplish this in the riser, the rise in the string is mitered, and the end of the riser is cut on the same miter.
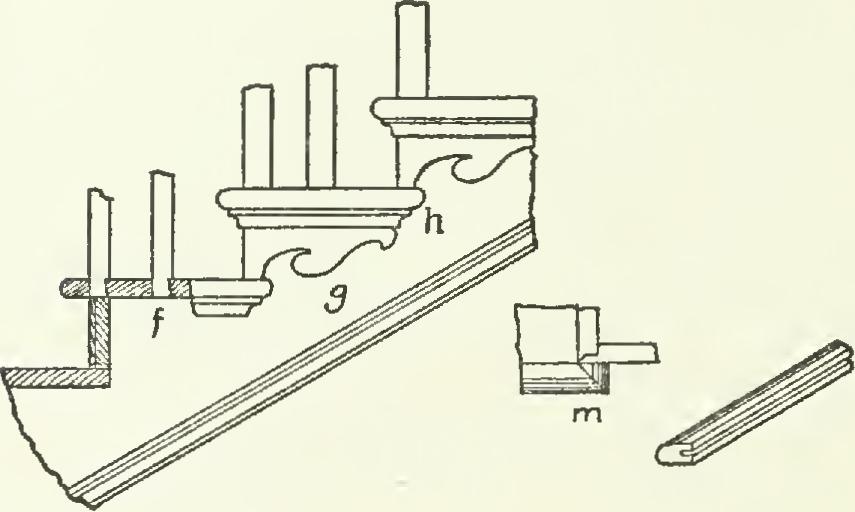
Fig. 79. Construction and Finish of Open Stairs, In Fig. 78, the different ways of mitering are shown. At a is a miter of forty-five degrees cut on both the string and the riser. This is the simplest method and the one more often used because of the saving in time. At b the riser has a shoulder to fit against the string, and only the outside is mitered. This makes a more rigid joint. At c the miter is cut at the front as at b, and the string is cut out to receive the remainder of the riser. Here the riser gets a stronger bearing upon the string; while in b, only the front of the riser gets a bearing.
When it is desired to make the face of the string more ornamental, a thin bracket is placed against the string, as shown in Fig. 79, at g. When this is done, the riser must be longer than the thickness of the bracket. This is necessary because the bracket is mitered to the riser. The cove under the nosing is placed upon the bracket, just as it is returned upon the face of the string in the case where the bracket is not used. The lower front part of the bracket rests upon the returned nosing of the tread.
In the best grade of work the brackets are glued upon the string, but ordinarily they are nailed on with brads, which are then set and the holes filled with putty.
The return nosing is mitered at the front of the tread to fit the nosing over the riser. At the back of the tread, a return is cut as seen in Fig. 79, at m, which is a plan of h.
After the balusters are in place, the return nosing is nailed to its proper place, and the nail-holes filled with putty; or a groove may be cut into it, as shown at the right in Fig. 79. On the end of the tread, as seen in Fig. 80, at a, a similar groove is cut and a thin piece of wood or tongue glued into the groove in the end of the tread. This tongue should properly have the grain of the wood run in the same direction as the grain in the tread. The return nosing is then fastened into place by gluing the tongue and the groove, and driving the nosing to a tight fit.
Another way to fasten the nosing is to cut notches on the under side of the tread, and put wood screws through into the return nosing.
A glance at these figures will show how the balusters are dovetailed into the tread. The Fig. 80. Construction and Finish of Open Stairs.
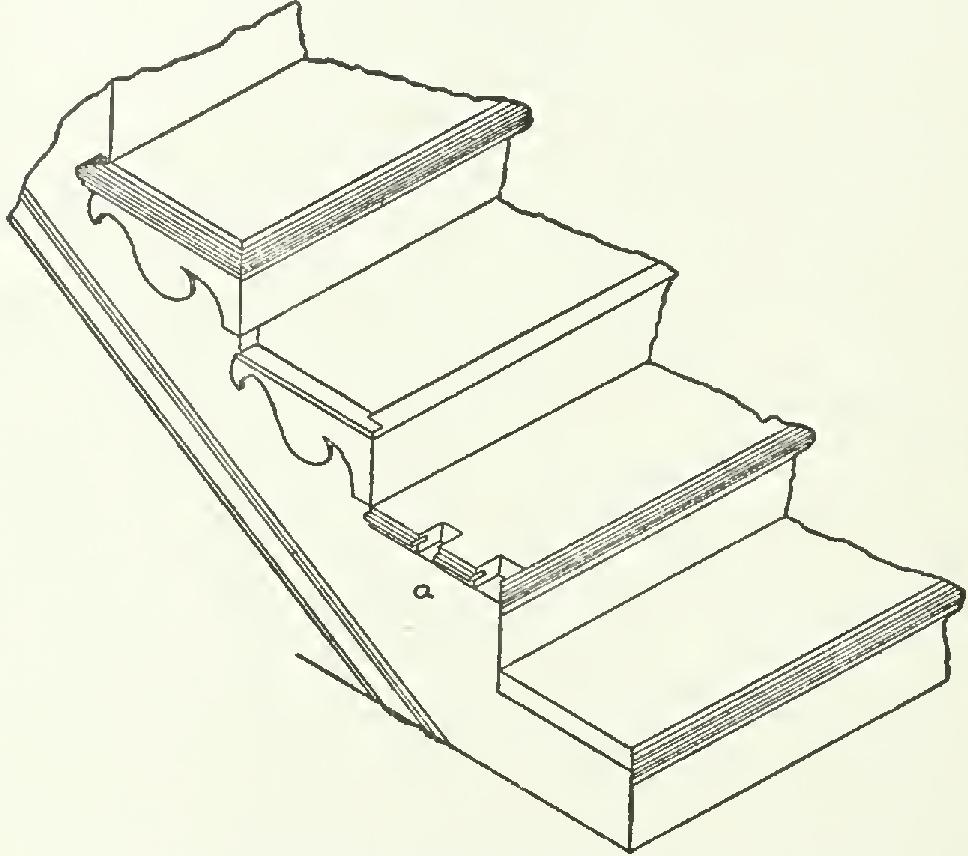
outside of the baluster should be flush with the face of the string; and where a bracket is used, this must be considered the face of the string.