Projection 49
plan, prism, degrees, angle, axis, position and fig
The prism is first placed with its base on H, and its faces at any convenient angle with V, as 60 degrees and 30 degrees. This position is shown at A, Fig. 58. Next, let the prism be re volved about an axis perpendicular to V through the right-hand corner of the base. This axis is lettered lb-eb on the drawing. The prism is revolved until its axis or its long edges make 30 degrees with H.
In this kind of a revolution, the V projection does not change shape or size, and will make with the ground-line the same angle that the prism makes with H (Article 64). Hence the elevation can be transferred from A to the 30 degree position at B, with point 1 on H.
The plan may then be constructed as in Article 63, Fig. 53, each point of the plan falling vertically below its corresponding elevation, and in a T-square line to the right of the same point in the plan of A. The edges of the prism now make the required angle of 30 degrees with the horizontal, and one corner is on H; but the final inclination has yet to be given.
In order that the prism shall have the in clination specified, it must be turned from the position of B so that the upper end will be away from the draftsman, and the lower end toward him. This may be done by considering the prism to revolve about a vertical axis through point 1. Each point of the prism will then move in a horizontal circle through whatever angle is desired. In this case, let the prism revolve about the vertical axis through 60 degrees; then point dh will move to dh, in the arc of a circle, and will be the new H projection of the edge 1-d.
In the same way, every other edge will re volve through an angle of 60 degrees, and will have its length unchanged. The new or revolved plan will therefore be of the same shape and size as before this second revolution. For the sake of clearness, this revolution is not made upon Fig. B; but, instead, the plan is drawn in Fig. C as it would appear after the revolution. The lowest corner 1 may be taken in any con venient position, and 1h-dh, is drawn at once at 60 degrees equal in length to lh-dh of Fig. B.
The plan of C is constructed equal to that of B by a method of rectangular co-ordinates, or offsets. In the plan of B, perpendiculars are drawn from each corner to the front edge 4-k. These perpendiculars intersect the edge, or the edge produced, in points such as f, g, m, etc.
Then, through Fig. C, a perpendicular is drawn to and is made equal to d"-f; and through f, a 60-degree line will represent the position of the edge 4h-k. The distance f-k of B, laid off from f of C, will give corner k in Fig. C. Then in C, lay off from f the distances f-g, f-m, f-n, etc.; these points, erect per pendiculars to 4h-k (these perpendiculars are 30 degree lines), and make these perpendiculars equal respectively to those of B. In this way the remaining corners of the prism are located, and the plan completed.
The elevation may now be constructed from the plan, if it is remembered that in the revolu tion around a vertical axis the heights of points remain unchanged. Hence, if the corners in the plan are projected vertically up and to the same heights as in the elevation of B, the desired points of the elevation will be determined. Notice which end of the prism is visible in plan, and which in elevation. In following out the figure as drawn, care should be taken to imagine the shape and position of the object in space as described by its projections.
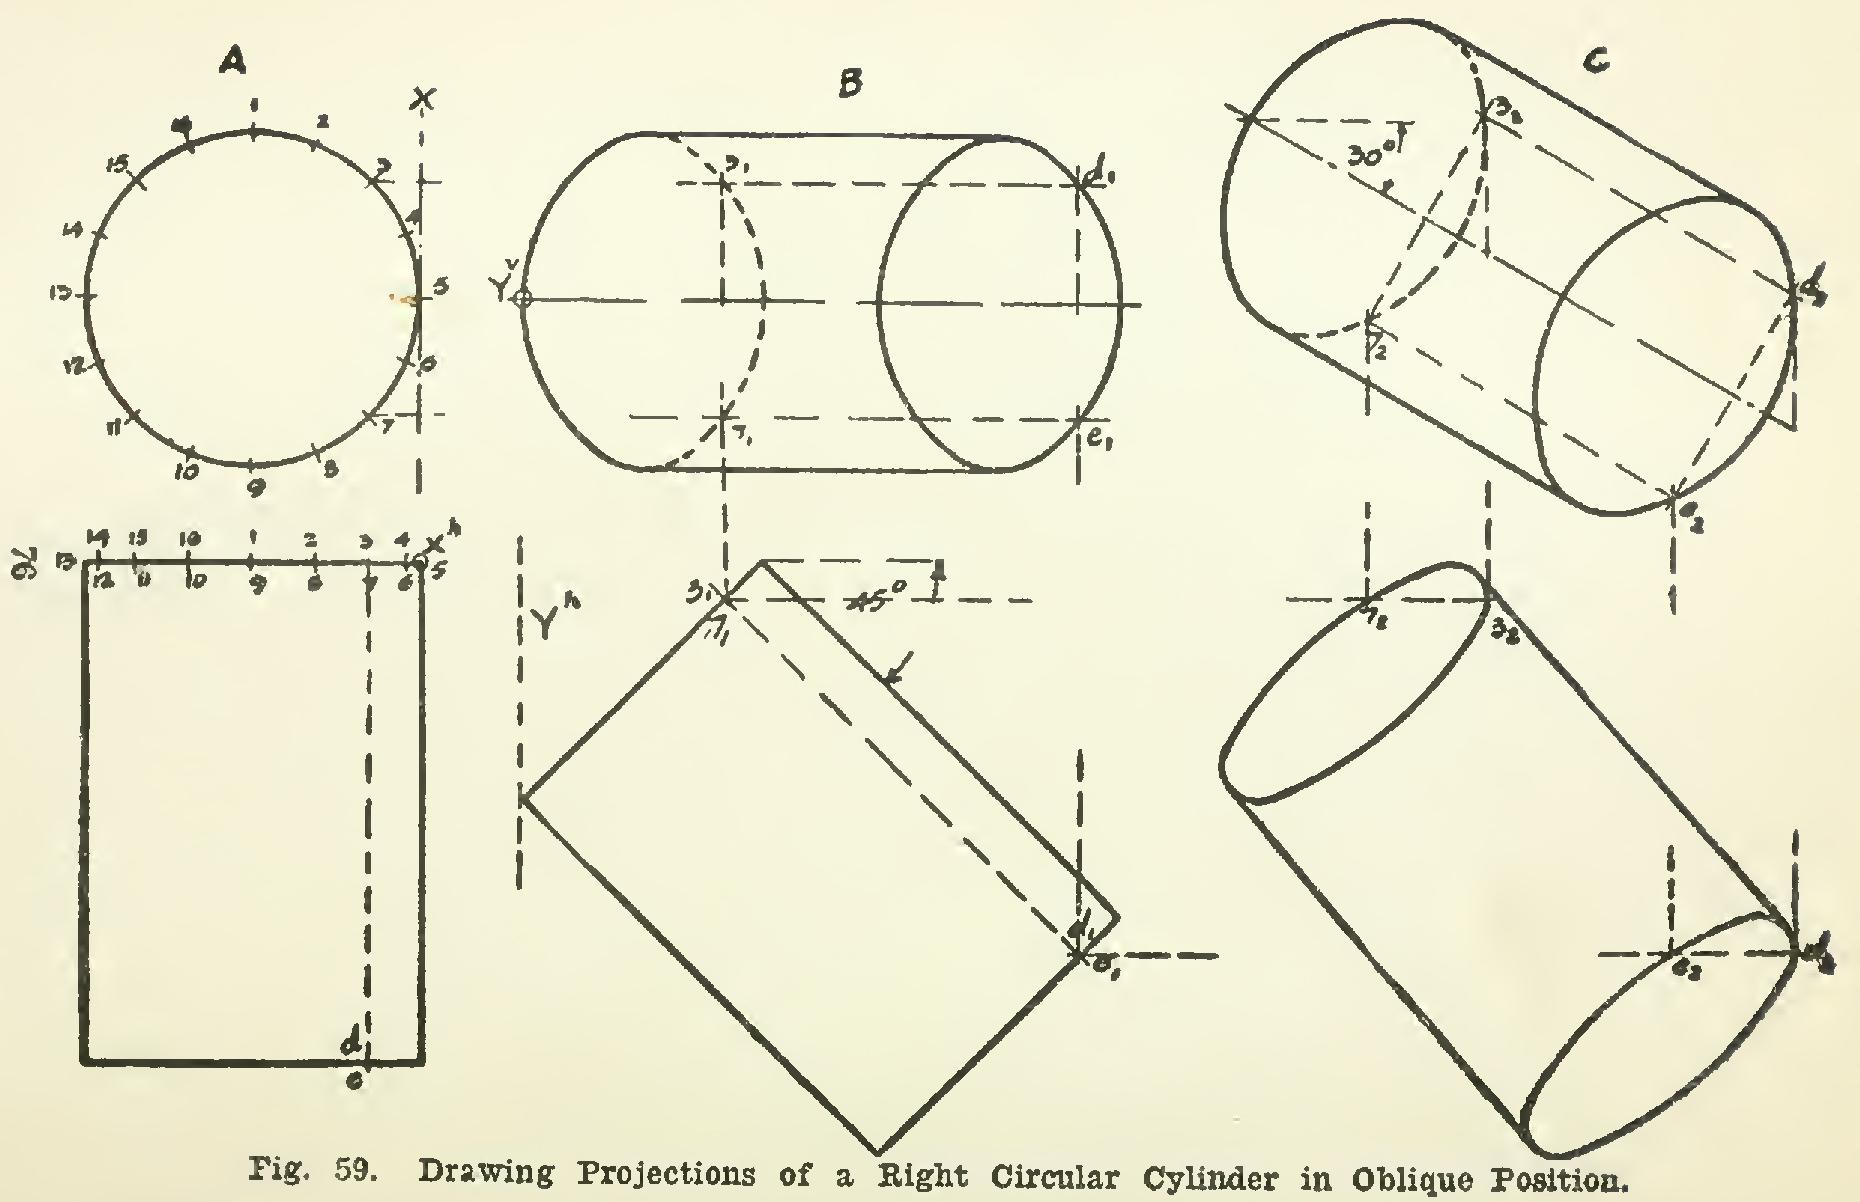
70. The projections of a cylinder or cone may be drawn in any oblique position by a process similar to the one just considered.
Let it be required to construct the plan and elevation of a right circular cylinder in the first angle, placed with its axis at an angle of 45 de grees with the vertical plane, its V projection inclined at 30 degrees with H; and let the cylinder slope downward, forward, and to the right. First, note with which co-ordinate plane the axis is to make the given angle. In this case, the given angle is 45 degrees with V. Then draw the cylinder in the first position perpen dicular to V, as in A, Fig. 59. Divide the base into any number of equal parts, as in the figure, and project these points to the plan.
Now, if a vertical axis, as X, be taken through any convenient point, as 5 on the back end, the cylinder may be revolved until it makes the required angle of 45 degrees with V. In this revolution, the cylinder will remain parallel to II, and its plan will be unchanged in size and shape; hence, in B, the plan of A is placed at 45 degrees with V, sloping forward and to the right.
