Simple Morris Chair Design
inches, pieces, inch, gauge, lines, knife and mark
SIMPLE MORRIS CHAIR DESIGN The Morris chair shown in Plate 14 and in Fig. 56 is somewhat easier to make than the one just described. It is just as roomy, however, and of just as thorough construction.
In a piece of furniture of this size, it is just as well to buy the stock mill-planed to the right thicknesses. Well-seasoned white oak, plain sawed, makes the best chair.
The pieces required are indicated in the ac companying mill bill: 4 pieces inches, by inches by 25 inches; 4 pieces of an inch, by inches by inches; 2 pieces of an inch, by 3 inches by 21 inches; 2 pieces of an inch, by inches by 40 inches; 4 pieces of an inch, by inches by 17 inches; 1 piece of an inch, by inches by 22 inches; 2 pieces of an inch, by 2 inches by 28 inches; 2 pieces of 1-inch dowel rod inches long; 5 pieces of an inch, by 2 inches by inches.

The figures given in the mill bill are for the finished pieces; and, in ordering, allowance must be made for sawing and planing.
The cheapest way to order stock is to order as few pieces as possible, doing your own cut ting up. In this case, one might order one board mill-planed on two sides to a thickness of seven eighths of an inch, with a width of ten inches and a length of eleven or twelve feet. Out of this board, all of the seven-eights-inch pieces may be cut by properly laying them out.
For the posts, a piece mill-planed to a thick ness and width of two and one-half inches, with a length of eight feet and six inches may be ordered.
In the same way, the other pieces may be combined in single pieces of the same thickness by consulting Fig. 56.
The four rails may be made first. Square four pieces of the seven-eighths-inch stock to a width of five and one-half inches and a length of twenty-three and three-fourths inches. The broad surfaces, if they are mill-planed, and the lumber if well-seasoned, need not be planed, except what is necessary to rid them of the mill marks.
Place these four pieces side by side, with the ends made even one with another by hold ing the beam of the try-square against the face of one of them and the blade across the ends. From one end, Fig. 57, measure one and three
eighths inches, and mark with a knife point.
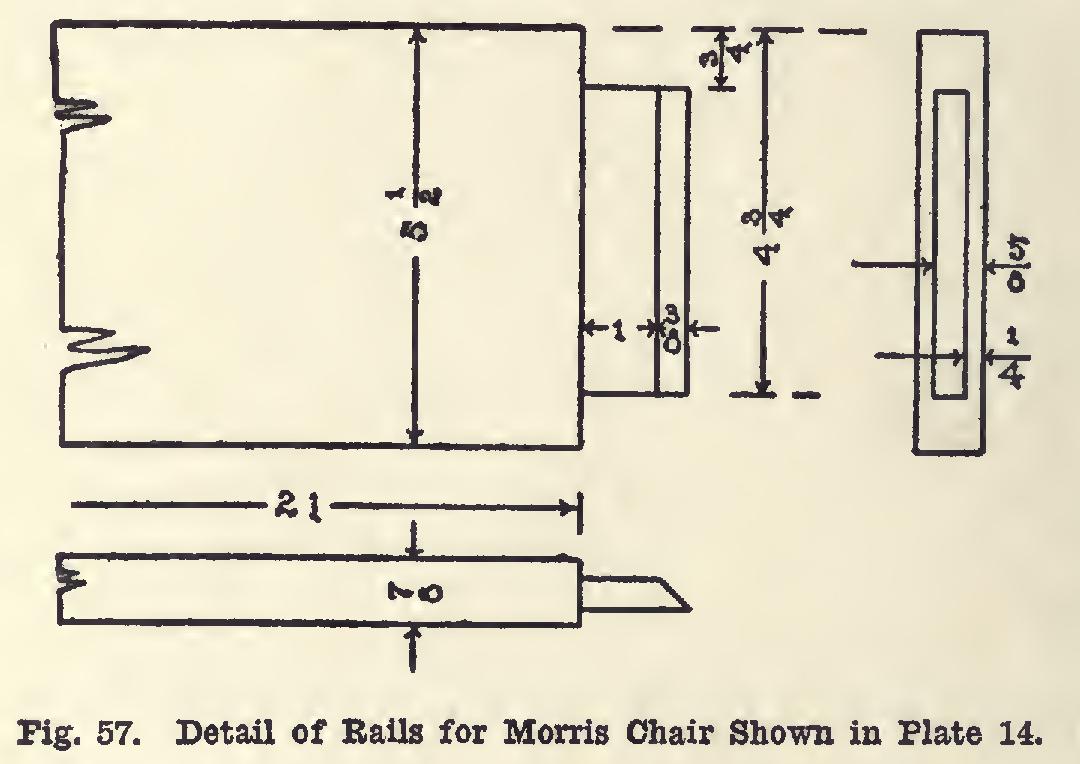
From this point, measure twenty-one inches, and mark. There should remain one and three eighths inches. Still holding the four pieces together, square knife lines across their edges with the beam of the try-square against one of the surfaces. Now separate the pieces, and square knife lines entirely around each end to correspond with the ones made on the edges. Keep the beam of the try-square against either the working face or the joint-edge. These lines mark the shoulders of the tenons.
Set the gauge to one-quarter of an inch, and, keeping the block against the working faces, gauge upon the ends and on the edges as far as the shoulder marks. Mark the eight ends in this way; then set the gauge to five-eighths of an inch, and mark as was just done, keeping the block against the working face.
Next set the gauge to three-quarters of an inch, and gauge on ends and surfaces, the gauge block being held against the joint-edge. Again, set the gauge to four and three-quarters inches, and gauge from the joint-edge. This lays out tenons three-eighths by four by one and three eighths inches. With the tenon saw, rip to the gauge-lines, and then crosscut to the knife lines. Only the most accurate cutting will give satis factory results, so that it is the better part of wisdom to "make haste slowly." The ends of these tenons will need to be mitered, as shown in Fig. 57.
While the seven-eighths-inch board is at hand, the cross-pieces for the back may be cut. Four pieces should be surfaced, planed to a width of one and one-half inches, and sawed to a length of seventeen inches. Place them side by side, and even the ends. From one end, Fig. 58, measure one inch; from this point, measure fifteen inches. There should remain one inch. Square knife lines across the edges of these points. Separate the pieces, and carry these lines entirely around the pieces. These tenons have but two shoulders, so that the gauging is done from the working face only. The gauge should be set to one-quarter of an inch, and the eight ends marked; then to five-eighths of an inch.