Simple Morris Chair Design
inches, one-half, legs, inch, lines and square
Instead of gluing the tenons on the legs, a wooden pin may be inserted through the edge of the arm, if desired.
If dowel rods of the required diameter can not be procured, they can easily be made. Rip a piece of the one and one-eighth-inch stock, and square its four surfaces to a thickness and width of one inch full; set the gauge to one-half the diagonal drawn on the end of the piece, and gauge on all sides from every side. Plane the corners off the square prism, planing to these lines so as to make a regular octagonal prism. Then plane off these corners so as to make six teen equal sides. The solid may now be reduced to a cylinder with scraper and sandpaper.
When the glue has hardened, the other rails may be put in place.
The back (Fig. 56) may next be made. The rails and their tenons have been described. For the stiles, square two pieces of one and one eighth-inch stock to a width of two inches and a length of twenty-eight inches. Bevel the top ends slightly. Place the pieces together with the joint-edges up; even the ends, and square sharp pencil lines across at the following con secutive points, beginning at the bottom ends: Four, one and one-half, five and one-half, one and one-half, five and one-half, and one and one half, five and one-half, then one and one-half inches. Set the gauge first to three-eighths of an inch, and mark between the lines one and one-half inches apart, on each piece; then set to three-quarters of an inch, and repeat. Out these mortises with the three-eighths-inch chisel, and number and fit the tenons in the usual way. In assembling use a clamp at each rail.
Square up two pieces of seven-eighths-inch stock to a width of three inches; fit them be tween the legs, and fasten them with screws to the side rails so that their top edges shall be one and three-eighths inches below those of the rails. If the chair is to have springs, no more wood work is necessary; but if not, square up five pieces of five-eighths-inch stock to a width of two inches, and fit them between the rails, fast ening their ends with light nails to the pieces just screwed to the side rails (Fig. 56).
The back is fastened with light iron strap hinges. They may be fastened as shown in Fig. 56, or one part may be fastened to the front of the stile, and the other to the back of the rail. A little experimenting will show the advantages and limitations.
It is intended that the rear legs shall be shorter than the front ones. Turn the chair on its side, measure off one inch on the back legs, and, holding a long straight-edge across both front and back legs, mark the slope, Fig. 56. The try-square and bevel-square will be needed to get the line entirely around the legs. If the legs are not squared to the same length—and time is saved by not doing so—the measurements must be made from the rail down eight inches on the front leg and seven inches on the rear.
Carefully clean off all surplus glue, for the stain and filler will not stick where glue covers the wood.

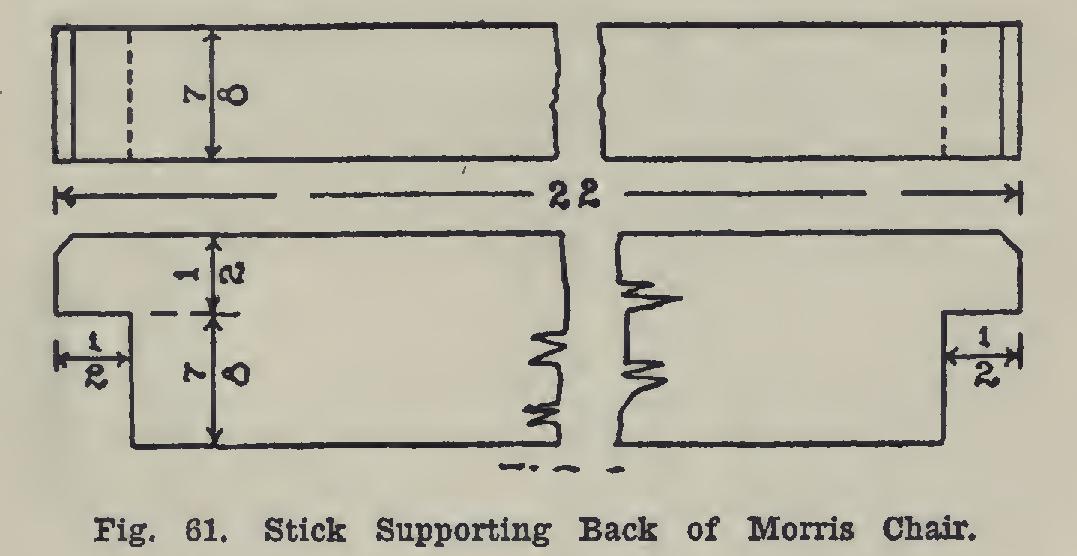
The stick which supports the back (Fig. 61) is made by squaring a piece of seven-eighths inch stock to a width of one and three-eighths inches, and a length of twenty-two inches. Lines are to be squared across one-half an inch from each end. The gauge should be set to seven eighths of an inch, and lines marked from the ends as far as the pencil lines. A slight bevel on the ends will remove the sharpness of the exposed end, Fig. 61.
A coat of brown Flemish water stain, diluted one-half with water, sanded lightly when dry, with a medium dark filler, and, when this has hardened, followed with a coat of thin shellac, makes a good finish. Wax may also be applied if desired.
Cushions may be purchased at almost any price one wishes to pay, in sizes to fit—from cheap cloth to expensive art leather.