Details of Construction
coat, plaster, lath, white, sand, vertical and girder
At the first-floor line, we have to build a sill upon the basement wall; this sill forms a sup port for the joist, and also gives a nailing for the studding. The method is clearly shown in Fig. 48.
Lath and Plaster. The interior finish of almost all residence work is lath and plaster. The walls, if of wood, and the ceiling, are lathed with good, sound lath, free from blue sap or bark, and of white pine or spruce. They should be spaced at least inch apart, and the plaster pressed firmly onto them so as to make sure that there will be a good key for holding the plaster. All lath on vertical walls should be put on horizontally, and there should not be a vertical joint of more than 18 inches between any series of laths. Under no consideration should lath be put on a vertical wall other than horizontally. In hot weather, it will be well to wet the lath before applying the plaster, as then they will not absorb so much water from the plaster.
Plaster is usually put on in three coats for woodwork, and in two coats for brickwork. The first coat consists of slaked lime, sand, and long, clean cattle hair or fiber, this hair or fiber being used to make the plaster hold together better.
The first or scratch coat is applied and pressed well into the spaces between the lath. It is this plaster getting in between the lath and falling over onto the lath, which forms the key or clinch for the plaster. This coat is then scratched with the trowel all over, in all direc tions. This scratching roughens up the surface, and makes a better surface for the second coat to adhere to.

The second or brown coat is a mixture of lime putty, sand, and a little hair or fiber, and is applied after the scratch coat has partially dried. This brown coat is brought out to a true line for all walls and ceilings, and corners are made true and sharp. There are placed around all openings and back of all chair rails, base boards, etc., small strips inch thick for three coat work, and inch thick for two-coat work, by inches wide. These are called grounds, and serve as a guide for the plaster (see Figs. 71 and 72). The third coat, sometimes called the white or skim coat, is a mixture of lime putty and white sand, with a little plaster of Paris. This is a thin, white coat, put on and rubbed down until hard, giving a hard white surface.
Sometimes marble dust is added, which makes it harder and gives a little more polish to the surface. If a sand finish is desired, instead of the white coat as above described, the third coat is mixed with lime putty and coarse sand.
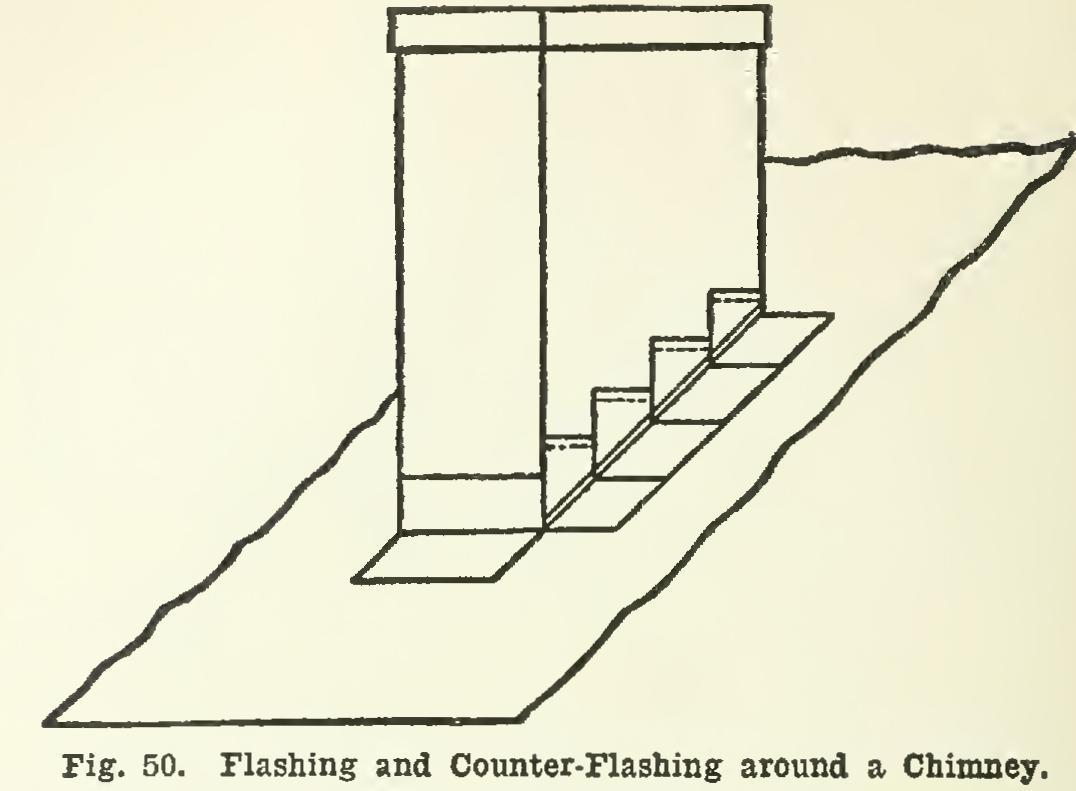
Flashing and Counter-Flashing.
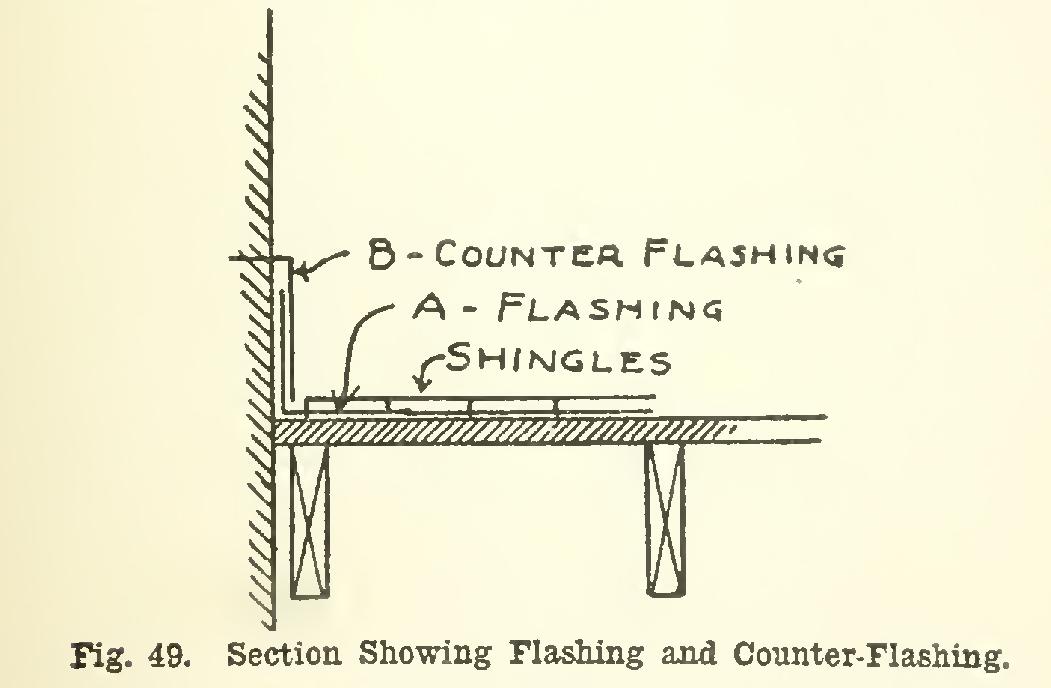
By flashing and counter-flashing is meant metal protection for the intersection of surfaces, to keep out the weather. Take an example of a chimney going through a roof. Some means must be provided to prevent snow and water from coming in through the space between the vertical side of the chimney and the roof. This is accomplished by using sheet metal—either copper, galvanized iron, or tin—and fastening it under the roof covering, turning it up against the chimney, as shown in Figs. 49 and 50, the piece marked A.
To prevent the water running down the side of the chimney, a cover-piece, called the counter flashing, is fastened into a mortar joint of the brickwork, and turned down over the flashing. The counter-flashing should extend to within two inches of the bottom of the flashing. This same method of protection applies to joining a roof to a vertical wall, the protection at the outside of a window-frame, or any other place needing similar protection.
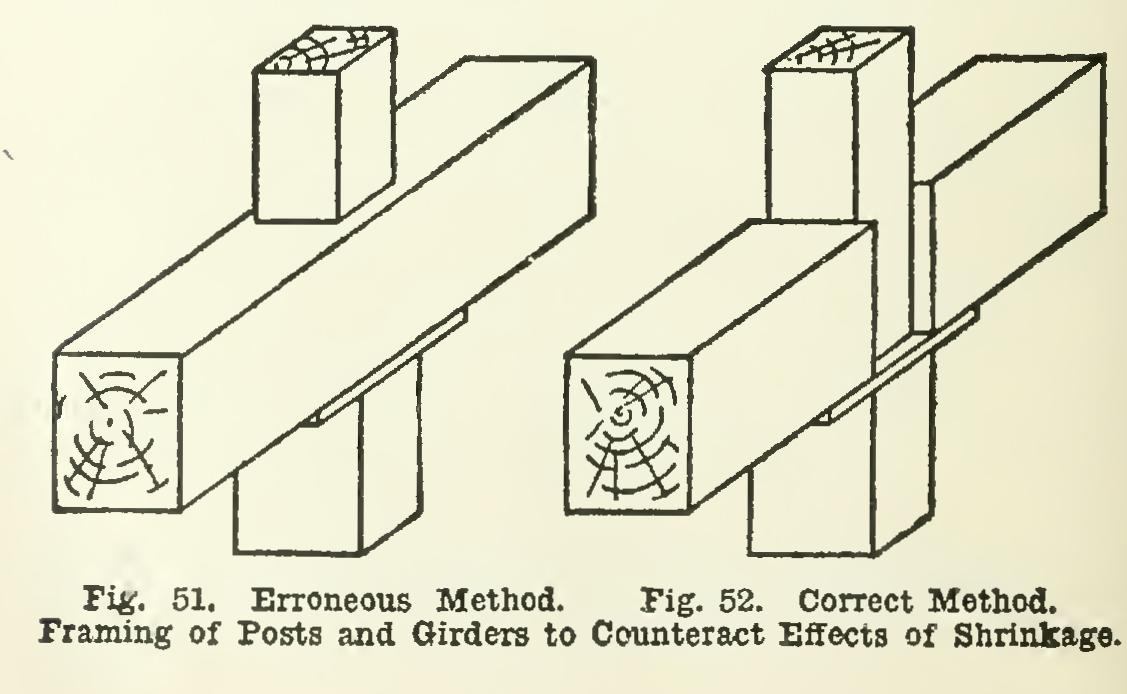
Shrinkage. A word might be said about shrinkage. All lumber, when exposed to heat, will shrink, owing to the moisture drying out. In all wooden construction, all parts should be carefully framed together to reduce the shrink age to a minimum. One common error in framing is shown in Fig. 51. The girder rests upon the post below, and the post from above rests upon the girder. We can see at a glance what happens when the girder commences to dry out. It will shrink, causing the post above to settle, which will affect the part of the build ing carried in this way. Fig. 52 shows a much better way of framing these posts. The post above rests directly on the post below; and the girder is carried by the steel plate as shown, or by means of a cast-iron post-cap. By this means the shrinkage in the girder does not affect the construction above. Carry out this same idea in all framing. When one partition comes over another, carry it on the cap of the partition below, and not on top of the floor construction.