A Writing Desk
inch, lid, lines, edge, piece, square and inches
The back piece corresponding to the ones just described should be gauged for the rabbet, first to three-eighths, then to three-quarters inch.
In getting the lengths of these pieces, the point A (Fig. 74) is the point from which the marking should be done, the dotted lines repre senting the side and back of the desk, the heavy lines representing the top pieces.
Fig. 71 shows the lid of the desk in one piece. The width on the drawing is indicated by a ques tion mark, meaning that the lid is to be fitted in place. A fourteen-inch board will be found wide enough. Square one edge and the two ends; then get the width by placing a short stick in position on the desk, and marking on it the proper distance. Transfer this to the lid, and plane the remaining edge, using the bevel-square to indicate the bevel.

To prevent the lid warping, if the proper ma chinery is available, the ends may be fixed as shown in Fig. 75. A three-eighths by one and one-half-inch piece is inserted.
Another way to stiffen the ends would be to tongue and groove as was described in the making of the drawing board.
Fig. 76 shows the manner of placing the hinges on lid and base.
Place the hinges on the lid first. Measure from each end of the lid three and one-half inches, and mark with a knife. Place a hinge in position, and, holding it firmly, mark around its three sides with the knife. Gauge for depth.

When the lid is open, its edge rests against the edge of the base so that when the hinge is opened out it should rest half-and-half.
Great care must be taken to have the hinge square with the edge when marking. If it be comes necessary, test the position with the try square.
Wheie the hinges are of uniform size, the gauge, try-square, and rule might be used.
In chiseling for the hinge, do not make the mistake of cutting on the line the first thing.
Make the vertical cuts about one thirty-second of an inch inside the lines; and, when the open ing has been trimmed to the proper depth, the chisel may be placed in the knife marks, and the sides finished.
The hinge should be sunk slightly below the surface, if the edges of lid and base are to touch when the lid is closed. The amount can be de termined only by trial. Cut shallow first, then deeper as needed. With an ordinary hinge, one sixteenth of inch lower will be needed.
With the hinges fastened to the lid, hold the lid in its horizontal position, its edge tight against the edge of the base; and mark around the hinges with the knife. Gauge for depth as
on the lid, and sink the hinges similarly.
A series of slanting chisel cuts where the hinge is to be placed will make the horizontal cutting much easier.
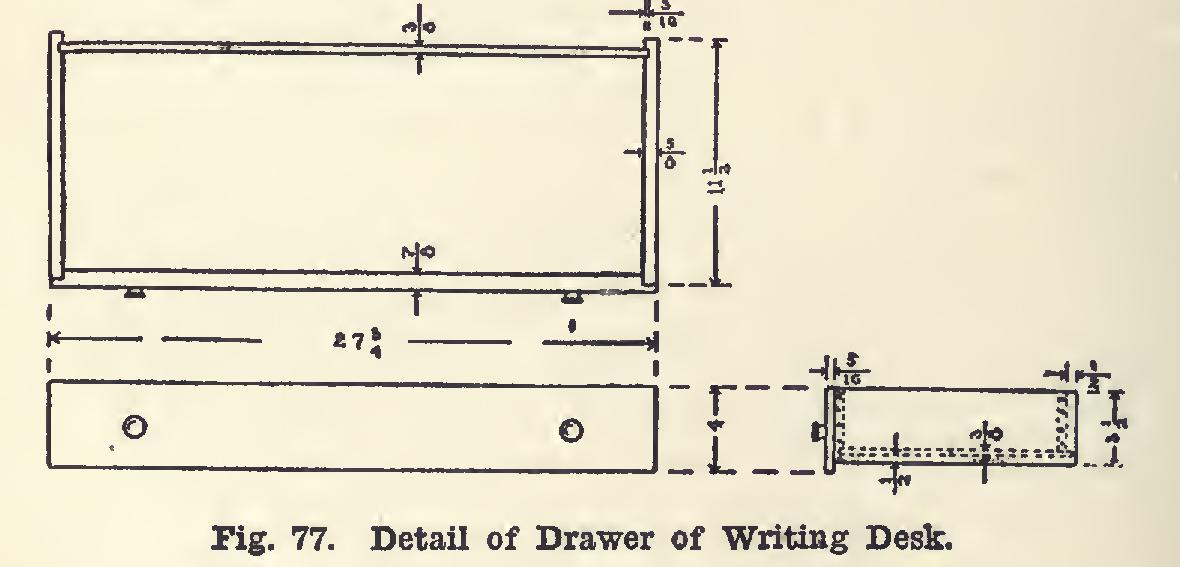
The drawer (Fig. 77) will require, in the rough, one piece of oak, seven-eighths by four and one-half by twenty-eight and one-half inches. This and all other stock should be mill planed to the proper thickness. For the sides of the drawer, two pieces five-eighths by four by twelve inches will be needed. These may be made of whitewood. One piece of whitewood three-eighths by eleven and one-half by twenty eight inches for the bottom, and one piece three eighths by three by twenty-eight inches for the back, should be got out.
Plane all the surfaces just enough to remove the mill-marks. Square the oak front piece to four inches by twenty-seven and three-quarter inches. Five-eighths of an inch from each end, on the back side, which is the working face, square knife lines across. Gauge on each end, five-sixteenths of an inch from the face. With the tenon-saw, rip and crosscut to those lines. Place the gauges on the rabbet plane so that it will cut a five-sixteenths-inch groove one inch from the bottom edge, on the back surface, to a depth of three-sixteenths of an inch.
Square the end pieces to three and one-half by eleven and one-half inches. Set the gauges on the rabbet plane so that it will cut a five-six teenths inch groove one-half an inch from the lower edge, on the inside surfaces, to a depth of three-sixteenths of an inch.
Measure one-half an inch from the ends of these pieces, and square knife lines across on the inside surfaces. From these lines, measure five-sixteenths inch, and again square lines across. These lines mark the sides of the gains which receive the back. See that they pair. Saw and chisel these gains to a depth of three-six teenths of an inch. Where there are many gains to be cut by hand, some carpenters tack a straight-edge across the piece along one side of the gain, and plane the gain with the dado plane. If machines or hand-planes are not to be had, the grooves may be cut entirely with chisel, the gauge being used to mark the sides.