A Writing Desk
inch, joint, fig, compartments, bottom and front
Square up the back to two and eleven-six teenths by twenty-six and seven-eighths inches. The bottom should have the same length, with a width of ten and three-quarters inches.

Fig. 77 shows the manner of assembling the parts, the sides being nailed to the front and back, but not the bottom.
As the bottom and back are of three-eighths inch stock, while the grains and grooves are five sixteenths, it will be necessary to plane on the under and back sides, at the ends of the pieces, until they enter. This insures a fit though the stock may vary slightly in thickness.
Fig. 78 (left) shows a side of the diawer fastened to the front with a half-blind-dovetail joint. This joint is rather difficult to make, and lack of space forbids its description at this time.
Fig. 78 (right) shows the joint just described.
Fig. 79 shows a joint which is an improve ment over that of Fig. 78. To make this joint, set the gauge to three-sixteenths of an inch, and gauge the ends of the drawer front, keeping the gauge-block against the working face, which is the inside surface. Again, set it to nine-six teenths, and gauge the ends from the working face. Chisel this groove to a depth of five eighths of an inch. Now saw away the thin tongue so that it shall be but three-sixteenths of an inch long.
The drawer sides must next be gained to re ceive the short tongue just formed. Gauge across the inner or face surface, a line three eighths of an inch from the end—or better, pro vided the ends are perfectly square, use try square, rule, and knife. A second line, three sixteenths of an inch further in, will indicate the remaining edge of the gain. Chisel to a depth of three-sixteenths of an inch. This joint may be glued up, or it may be nailed with light brads.
Fig. 80 gives the front and side views of the compartments. All stock is to be of three-six teenths-inch whitewood, mill-planed on two surfaces.
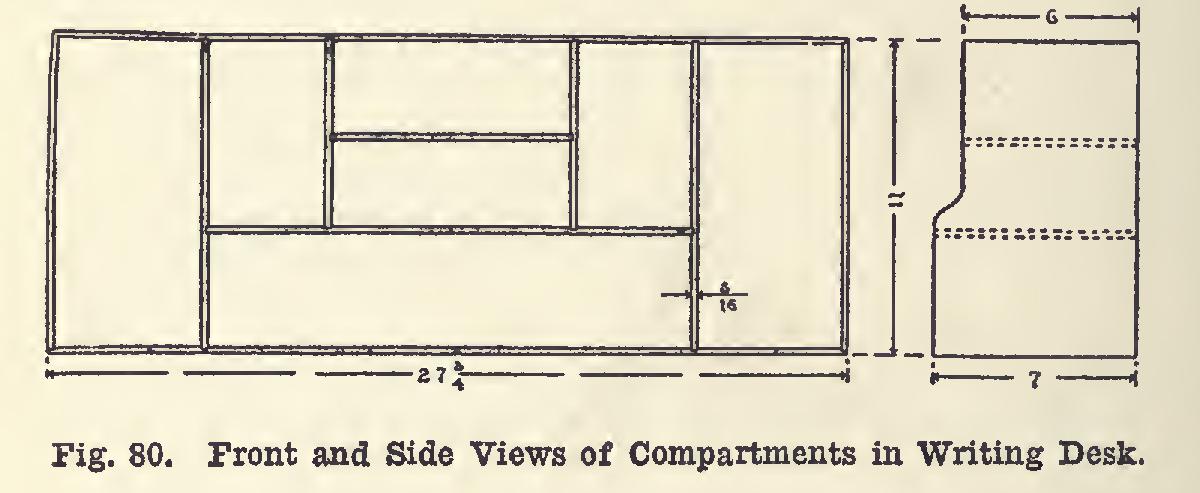
The plan of arrangement shown is merely suggestive. The best arrangement will depend upon what is to be kept in the desk. The essen tial thing, however, is to keep the length twenty seven and three-quarters inches, and the height eleven inches, to insure the compartments being placed within the desk easily.
It is intended that the compartments shall have sides, top, and bottom independent of the desk walls, but that the whitewood back of the desk shall answer as well for the back of the compartments.
It will be noted that all ends are gained into the pieces they join. As the ends cannot be planed beveling to make a fit, the gains must be cut accurately and of full width, a depth of one sixteenth of an inch being sufficient. Use glue and brads to fasten the parts together.
Stain all the oak with a medium-dark water stain. Sandpaper lightly with number 00 when dry, just enough to smooth the grain which has been roughened by the stain. Apply a medium dark filler, following the maker's directions. Two coats of floor wax, or beeswax mixed with turpentine, well rubbed, will give a good finish.
An extremely light coat of shellac, applied just before the wax and allowed to dry, will aid greatly in "bringing out" the beauty of the grain. Much mission furniture is never waxed at all, the light shellac giving the final finish.
After the body has been filled, the back may be nailed in place. The boards should be thor oughly sanded and cleaned before being put on.
Shellac the whitewood of the back and of the drawer, as well as of the compartments, with two or three thin coats.
The compartment may be fastened to the base with two light brads, when all finishing has been done.
The pulls for the drawer can be purchased at the hardware dealer's. Brass knobs with chine screws are quite satisfactory.