Door
inches, inch, edge, length, three-quarters, width, fig and shelves
The three middle shelves are laid out and cut similarly to the top and bottom shelves (Fig. 82). The only difference being that a seven eighths-inch strip is taken off the front edge to allow for the thickness of the door. This makes these shelves ten and three-eighths inches wide, instead of eleven and one-quarter as in the first two. The gauge settings from the back edge are the same as the others, and time will be saved by preparing all the shelves so that their tenons and key mortises may be laid off at the same time.

The two sides are to be squared to a width of twelve inches and a length of fifty-eight inches (Fig. 83). On the top end, the forward corner of each piece is rounded. Dividers are set to one and one-half inches.
The two pieces are set on edge, the ends evened, as were the shelves, and the mortises laid off as follows. A very sharp pencil would better be used, to avoid scratching the surface. Measure on the edge of one, from the bottom, consecutively, three inches, seven-eighths, four teen and nine-sixteenths inches, etc. (see Fig. 83). Separate the pieces; and, with the steel square, carry these lines down either side of each. Gauge from the back edge, between the penciled lines which indicate the width of the mortises. From the dimensions on Fig. 83 may be obtained the settings for the gauge.
These mortises should be bored with as many holes as can be placed therein, of a size almost equal to the width of the mortise. They may then be chiseled as were the mortises for the keys.
The inner, back corners of the sides are to be rabbeted to receive the back. This rabbet is to be cut three-quarters of an inch wide on the inner faces, and one-half an inch deep. It may be cut with a rabbet plane to within four or five inches of the lower end, then finished with the chisel to within three inches.
Cutting the rabbet three-quarters of an inch allows the back to be paneled, using a frame three-quarters of an inch thick. If the three eighths-inch matched ceiling or wainscoting is used, there will be an offset in the back, which is not altogether a bad thing. A little fore thought will show how it can be avoided if de sired. The advanced worker will probably pre fer to panel the back.
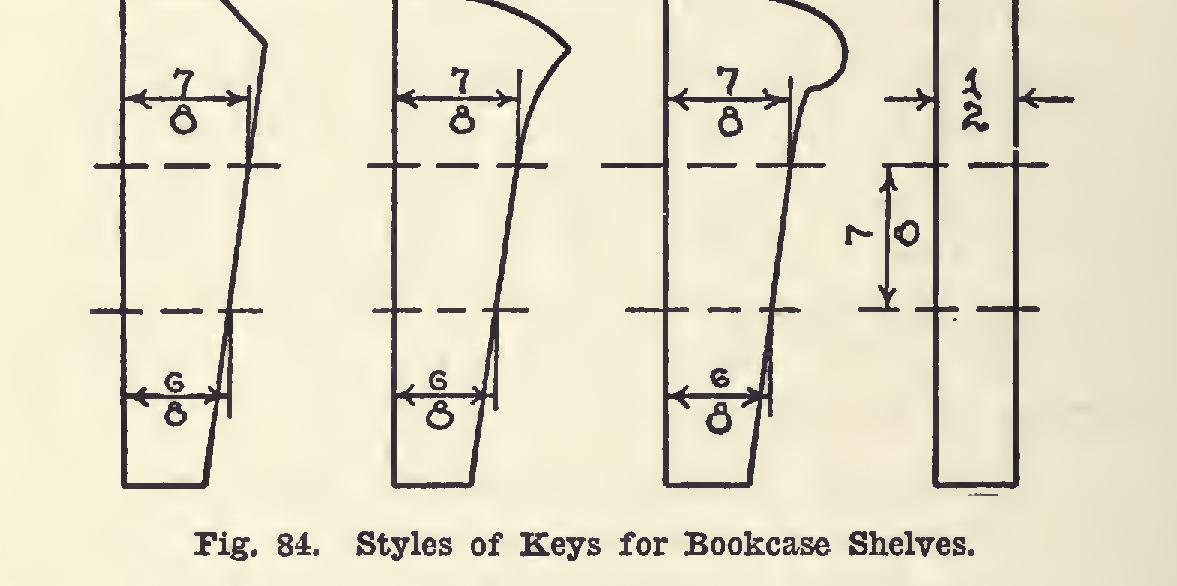
The keys may be made in a variety of styles. Fig. 84 offers some suggestions. The length may be varied. The essential thing is that they shall fit the mortises so as not to be either too large or too small. This may be accomplished by squaring the pin to size on the three straight sides. The ends, too, if they are to be square, should be planed at this time. Find the middle of the length, and measure to either side seven sixteenths of an inch, one-half the thickness of the tenon on the shelf. Square lines across the
three planed surfaces at these points. From the back edge, the narrow planed surface, meas ure along the upper line a distance equal to that of the top side of the key's mortise, seven eighths of an inch. Along the lower line, meas ure three-quarters of an inch, the length of the lower side of the key's mortise. Through these two points a line should be drawn. Whatever the shape of the front of the pin, these two points should not be changed if the key is to fit properly.
The parts of the frame may next be sand papered and put together. No glue is necessary, the keys holding it sufficiently. The keys may be "forced" a little, but judgment must be used, else the end of the tenon may be split out.
The piece which goes across the back, at the top, is to be squared three-quarters by three and three-quarters by twenty-nine and three-quar ters inches. It is to be nailed or screwed in place from the back side (Fig. 85). Its lower edge reaches half an inch on the edge of the top shelf, the back of the case covering the other part.
If wainscoting is to be used for the back, it may be cut to length, and nailed. Begin at one side and toenail through the tongue into the shelves, using light nails. The frame should be squared so that the shelves make right angles to the sides, before any of the back is applied. A steel square is good, or the diagonals may be measured with a stick, the frame being shifted until they are equal. A strip should be "tacked" across a corner to hold the frame in shape until enough of the back has been fastened to hold it.
A paneled back which is more in keeping with the spirit of craftsman design and work manship is made as follows: There will be needed for it two pieces which will finish to a thickness of three-quarters of an inch, with a width of two and one-half inches, and a length of forty-seven and five-eighths inches. These are for the muntins. For the stiles, plane two pieces to the proper thickness, three quarters of an inch, jointing one edge only. Cut to a width of about three and a-quarter inches, with a length of fifty-three inches, or a little more. For the rails, plane two pieces to a thick ness of three-quarter inch, jointing one edge only. The width of one piece should be about two and three-quarters, and of the other four and three-eighths inches. The length of each should be twenty-six and three-quarter inches. There will be needed three panels accurately planed to a thickness of one-quarter inch, with a width of seven, and a length of forty-five and three-eighths inches (Fig. 86).