Roughing-In
lead, pipe, joint, pipes, soil-pipe, cut and hammer
ROUGHING-IN As we now have the drain-pipe into the base ment of the building, we are ready to rough-in the job, and a few words regarding the proper manner of handling soil-pipe will be useful.
Cutting Soil-Pipe.
We shall have a num ber of pieces of soil-pipe to cut to various lengths as the job progresses, and the best way to cut the pipe is with a narrow, sharp-pointed chisel, and a medium-weight hammer. This gives better results to the average mechanic than the use of three-wheel cutters, on ac count of the liability to crack the pipe, which is very easily done with the cutters be cause of the pipe not being of uniform thickness throughout, and because with the cutters this variation in thickness cannot be so easily de tected as with the hammer and chisel, the ear being of great assistance in determining whei., the pipe is thick and thin. Lay the pipe on the floor, and place a narrow piece of wood under the place marked for cutting. The pipe should be marked with chalk entirely around at the place where it is to be cut. Then use the chisel and hammer. Filing a groove around the pipe where it is to be cut is not necessary, since the chisel will make a clean, square cut, as you will find, after a little practice.
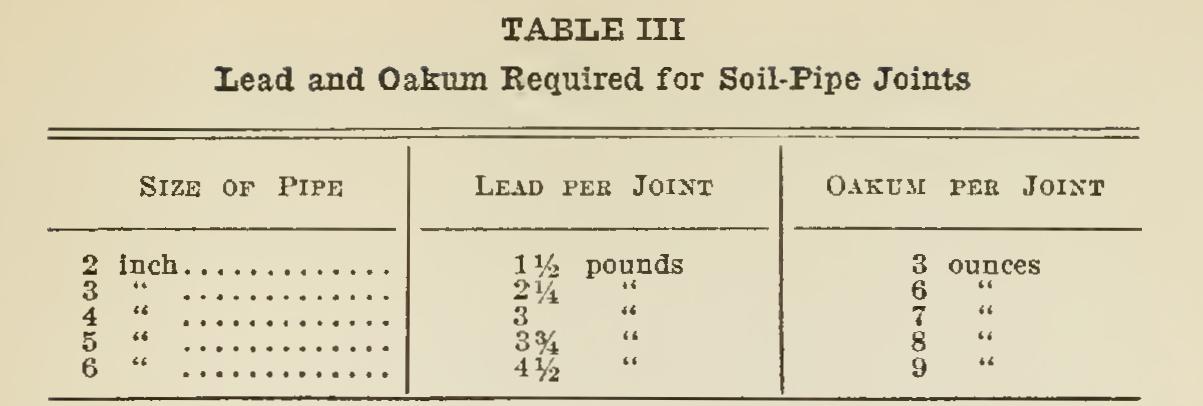
Soil-Pipe Joints. Fig. 4 shows the proper manner of making a soil-pipe joint, and Table III shows the amount of lead and oakum required for the various sizes.

The proper method of making a soil-pipe joint is to carefully pack the same with oakum, and leave a space of 11/4 inches for the lead. The oakum must be calked tightly before pour ing in the lead. If the pipe has not been cut exactly square across, care must be taken that none of the oakum is driven into the pipe to present an obstacle to the flow of waste matter and in time cause a stoppage. The joint will then be poured with the hot lead, in one pour ing; and after the lead has cooled, it will be properly calked tight with the proper calking chisels and a light hammer, bearing in mind that at every blow of the hammer you are creating a pressure on the hub which may crack the hub unless the operation is carefully done. The joint
should always be run full at one pouring; if this is not done, the lead should be picked out and the joint poured again.
Pouring lead in an upright joint is a very simple matter; but when we come to a horizontal joint, this requires different handling, and we have recourse to a joint-runner made of asbestos, which clamps around the pipe in such a manner that it leaves an opening on top for the pouring of the lead. Clay or putty may be used for this purpose, but are makeshifts and very unsatisfactory.
If there is dampness in the joints, placing some pulverized rosin in the hub before pouring will be beneficial.
Always have your lead HOT, and do not try to pour a joint with half-warm lead. Nothing but lead free from solder or other metals should be used, in order to avoid cracking the hubs when calking.
The Piping System. We shall have a num ber of pipes throughout the building to install; and they are as follows: Drainpipes, which are horizontal and receive the dis charge from the vertical or upright pipes.
Soil pipes, which receive the discharge from the closets. Waste pipes, which receive the discharge from fixtures other than closets.
Vent pipes, which relieve the air pressure on the sys tem, prevent siphonage and create a circulation of air throughout the system.
Water pipes, which supply water to the various fix tures.
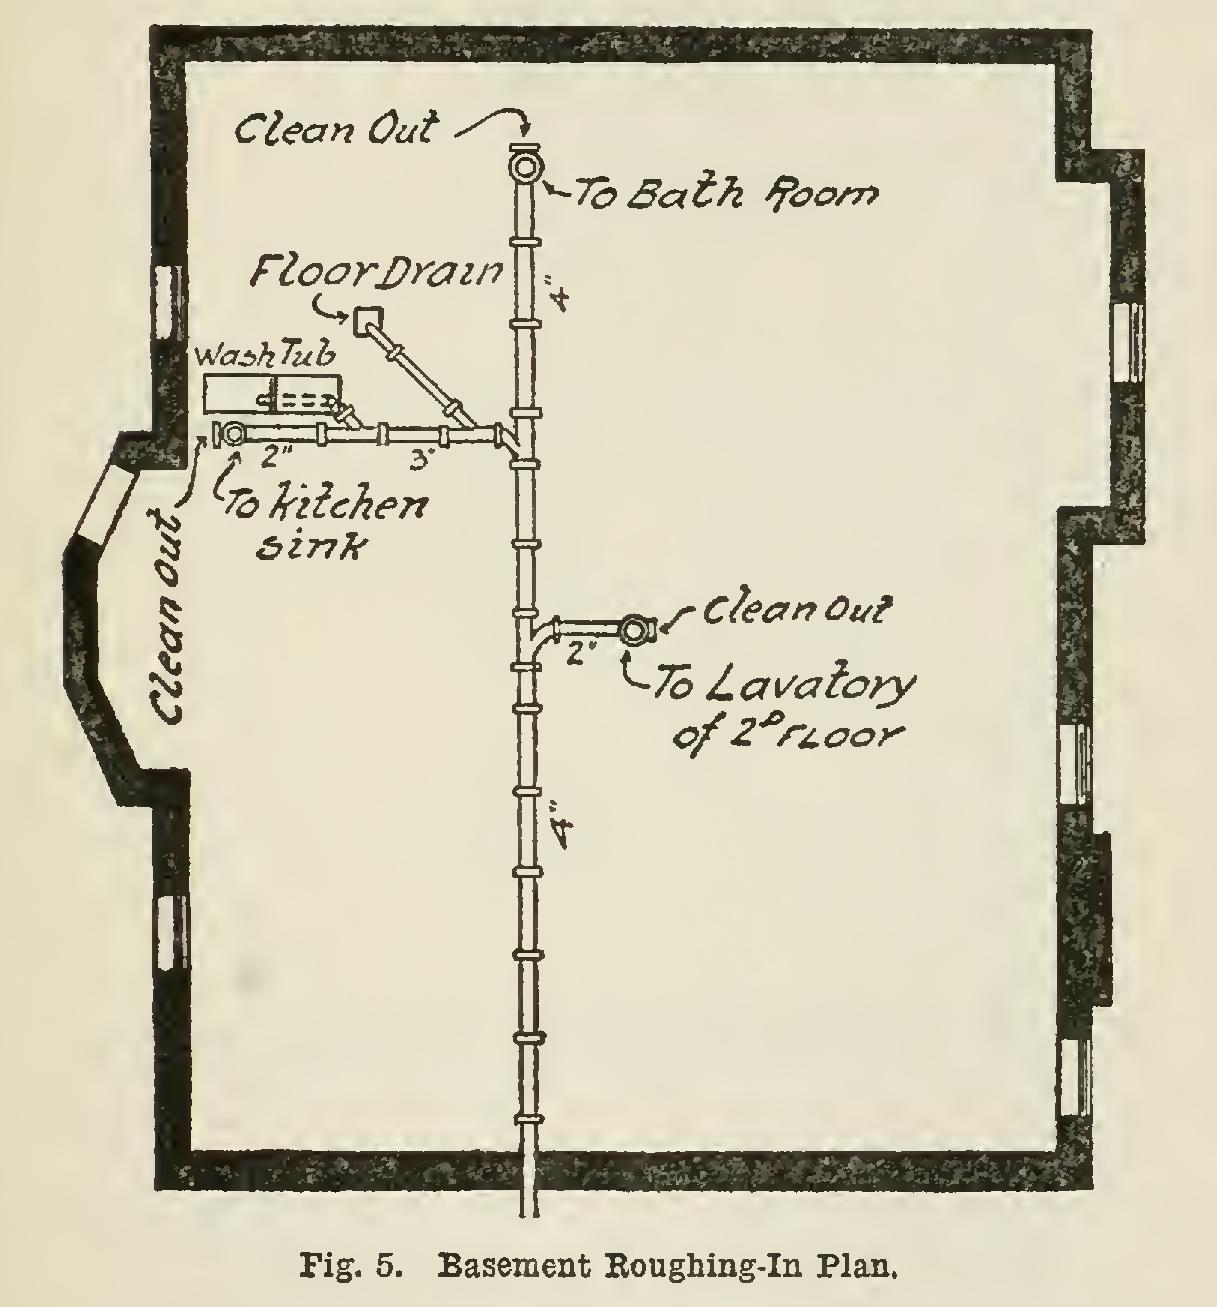
We shall now proceed with the roughing-in of an actual job. Suppose that we are to install the plumbing iu a house of which Figs. 5, 6, and 7 show the basement, first-floor and second-floor plans. The fixtures on the job are as follows: Basement 1 Two-part Wash Tray.
1. Floor Drain. 1 Sink.
First Floor 1 Forty-Gallon Range Boiler.
1 Lavatory. 1 Lavatory.
Second Floor 1 Bathtub.
1 Water Closet.
Right here is the time when you have to know the roughing-in measurements of the various fix tures, in order to place the pipes so that they will be in exactly the right places when the floors are down and the plastering done. Having deter mined what these measurements are to be, we are ready to proceed.